Browse Tag

linux

OverTheWire: Bandit Level 0

Definitely, level 0 is a giveaway to get you started with the actual challenges.

Level 0 goal: The goal of this level is for you to log into the game using SSH. The host to which you need to connect is bandit.labs.overthewire.org. The username is bandit0 and the password is bandit0. Once logged in, go to the Level 1 page to find out how to beat Level 1.

Firstly, you should know how to connect to the bandit.labs.overthewire.org server via secure shell (SSH) protocol. If you are using Kali Linux, you can directly run an SSH command to connect to the server. However, if you are using Windows, there is no SSH client installed by default.

putty

While there are many very good SSH clients in the market that were designed for Windows environment usages, personally, I would prefer PuTTY as it is easy to setup and pretty lightweight.

Once you are done, press “Open” and you should be able to gain access to the bandit0 box.

lvl0

OverTheWire Bandit – Level 0 to 6 – detailed step-by-step walkthrough video with explanations!

OverTheWire Bandit Write-up

I created a series of detailed step-by-step walkthrough video with explanations.
Check out the playlist here: https://www.youtube.com/watch?v=93PE-kStl34&list=PL2mncq0mb-6ibI02KufoaXnZHgNc6G9dO

A list of write-ups for OverTheWire Bandit, a simple Capture The Flag (CTF) game aimed at beginners.

The objective of the game is to solve the challenges and find the password to proceed to the next level.

To get started, the player needs to know how to connect to the server using a Secure Shell (SSH), which is essentially the bread and butter of any information security professional. Fine, probably something essential for any IT professionals to know how to use. 

For an absolute beginner who has not used SSH before, it is never too late to get started. It is time to put on a learning hat and try out the OverTheWire Bandit challenges!

OverTheWire Bandit

While the website itself did mention that the challenges were designed for beginners, it is still pretty fun for IT professionals to challenge themselves.

https://www.youtube.com/watch?v=93PE-kStl34&list=PL2mncq0mb-6ibI02KufoaXnZHgNc6G9dO

List of Write-ups

Fixes for VM: No Internet Connectivity

Have you ever experienced situations when you Virtual Machines (VM) were unable to connect to the internet after you have boot it up?

Initially, you probably only have a loopback IP address like the following, well, you are not alone – it happened to me when I was setting up my new Kali Linux or Ubuntu VM as well.

lo        Link encap:Local Loopback
          inet addr:127.0.0.1  Mask:255.0.0.0
          UP LOOPBACK RUNNING  MTU:16436  Metric:1
          RX packets:56011078 errors:0 dropped:0 overruns:0 frame:0
          TX packets:56011078 errors:0 dropped:0 overruns:0 carrier:0
          collisions:0 txqueuelen:0
          RX bytes:4792283266 (4.4 GiB)  TX bytes:4792283266 (4.4 GiB)

You have probably restarted your networking services,

service restart networking

Or performed all kind of different steps, configuring your network, subnet, dhcp, etc information at /etc/network/interfaces but to no avail… you probably have an IP address, but you cannot connect to the internet.

ping: www.google.com: Name or service not known

Today, I am going to share a fix for this issue. It is actually very simple, but it took me a series of troubleshooting before I discover these simple steps to resolve this issue.

Step 1: Simply download the vmnetcfg.exe file, you can easily find an updated copy of the file from the internet. Don’t forget to scan it using virustotal, make it a habit.

By the way, if you are interested, vmnetcfg.exe is a tool which allow users to manage a Windows host computer’s virtual interfaces.

Step 2: Place the vmnetcfg.exe file inside your program files folder.

It is probably located at the default location of “C:\Program Files (x86)\VMware\VMware Workstation” when you installed VMware Workstation to your computer.

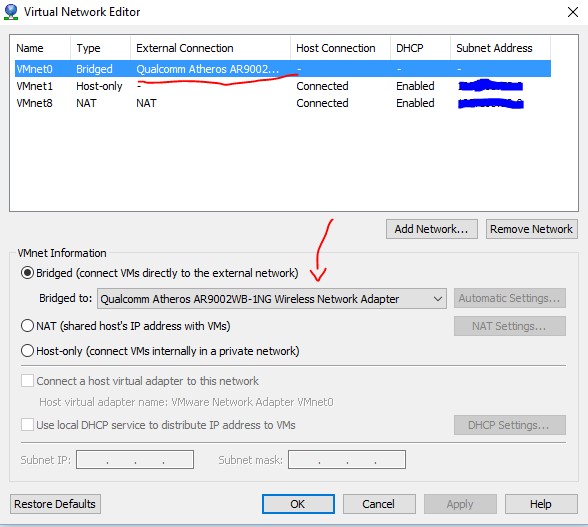
Step 3: Here is the most important part. Run your vmnetcfg.exe file, you will find the following window appearing on your screen.

Look for your VMnet0 or whichever port that is mapped to your machine’s network card, select the option of “Bridged (connect VMs directly to the external network)” and choose your network card in the drop down list. When you are done, click “OK” and there you go, your issue is probably fixed.

vm_no_internet_issue

Well, I hope that this post has served you well and helped you save some time.