Browse Category

Write-ups

OverTheWire: Bandit Level 16 to Level 17

bandit16_1

Level goal: The credentials for the next level can be retrieved by submitting the password of the current level to a port on localhost in the range 31000 to 32000. First find out which of these ports have a server listening on them. Then find out which of those speak SSL and which don’t. There is only 1 server that will give the next credentials, the others will simply send back to you whatever you send to it

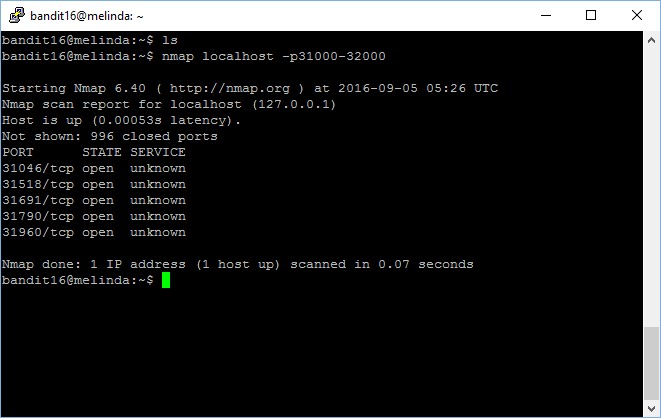
This level require us to have basic understanding in port scanning and identifying the services. First, let’s perform a port scan to identify the open ports between the range of 31000 to 32000.

bandit16@melinda:~$ nmap localhost -p31000-32000

Starting Nmap 6.40 ( http://nmap.org ) at 2016-09-10 14:17 UTC
Nmap scan report for localhost (127.0.0.1)
Host is up (0.00088s latency).
Not shown: 996 closed ports
PORT STATE SERVICE
31046/tcp open unknown
31518/tcp open unknown
31691/tcp open unknown
31790/tcp open unknown
31960/tcp open unknown

Nmap done: 1 IP address (1 host up) scanned in 0.07 seconds

Now there we have shortlisted only 5 ports with services, we will test if it is configured to accept normal connectivity or restricted to only SSL connectivity. For instance, we can do it using the following command,

bandit16@melinda:~$ echo test | nc -v localhost 31046
Connection to localhost 31046 port [tcp/*] succeeded!
test

We see that port 31046 is able to accept non-SSL connection, which means that this is not our target. Let’s check out the other 4 ports as well.

bandit16_2

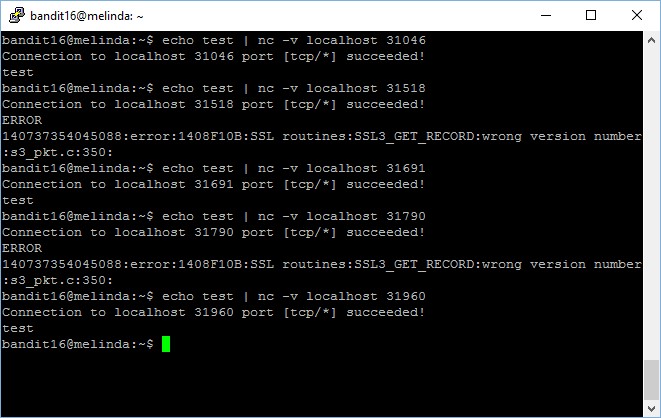
Now, we will focus on the 2 ports which produced error output because they are configured to restrict connectivity to SSL only. We will now try to connect using openssl with s_client option, to check if there is any correct output.

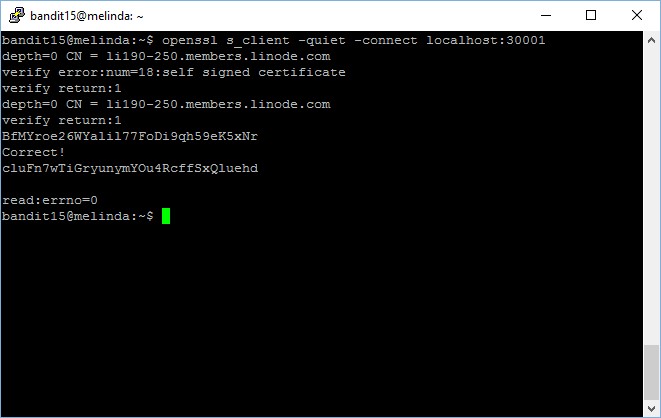
bandit16@melinda:~$ echo cluFn7wTiGryunymYOu4RcffSxQluehd | openssl s_client -quiet -connect localhost:31790
depth=0 CN = li190-250.members.linode.com
verify error:num=18:self signed certificate
verify return:1
depth=0 CN = li190-250.members.linode.com
verify return:1
Correct!
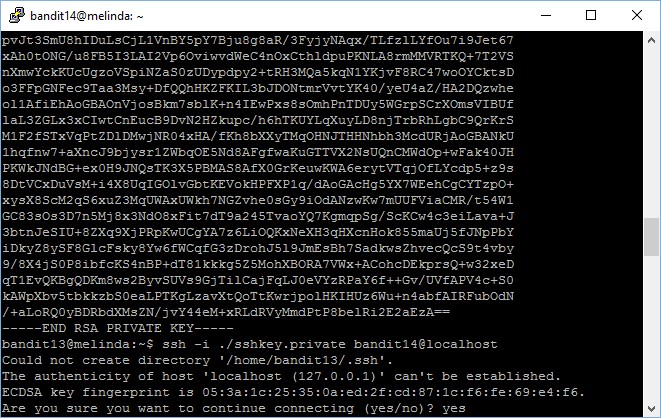
{ ... RSA PRIVATE KEY ... }

bandit16_3

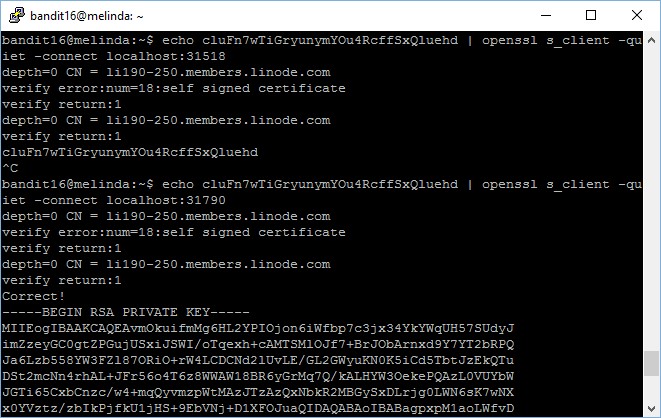
The private key for accessing the next level is stored in port 31790! Now, I have to save this RSA private key into a file and then use it to connect to the next level.

After you’re done with the “copy and paste”, try to connect, you should encounter an error message, which is a good learning point with regards to RSA keys permissions,

bandit16_5

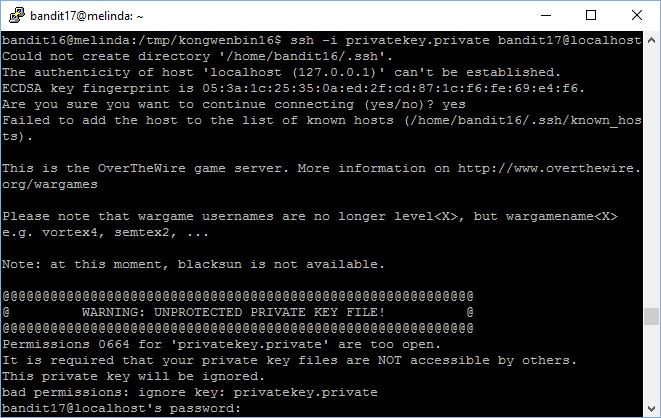
The fix is very simple, simply modify the file permission and set it as 400 and you are good to go!

bandit16_6

bandit16_7

There you go, you are in!

OverTheWire: Bandit Level 15 to Level 16

bandit15_1

Level goal: The password for the next level can be retrieved by submitting the password of the current level to port 30001 on localhost using SSL encryption.

Helpful note: Getting “HEARTBEATING” and “Read R BLOCK”? Use -ign_eof and read the “CONNECTED COMMANDS” section in the manpage. Next to ‘R’ and ‘Q’, the ‘B’ command also works in this version of that command…

In this level, we connect to the port 30001 on localhost using the SSL encryption. We can do it using the openssl command.

bandit15@melinda:~$ openssl s_client -quiet -connect 127.0.0.1:30001
depth=0 CN = li190-250.members.linode.com
verify error:num=18:self signed certificate
verify return:1
depth=0 CN = li190-250.members.linode.com
verify return:1
BfMYroe26WYalil77FoDi9qh59eK5xNr
Correct!
cluFn7wTiGryunymYOu4RcffSxQluehd

read:errno=0

The password to gain access to the next level is cluFn7wTiGryunymYOu4RcffSxQluehd.

OverTheWire: Bandit Level 14 to Level 15

bandit14_1

Level goal: The password for the next level can be retrieved by submitting the password of the current level to port 30000 on localhost.

Surprisingly, I have already accidentally resolved this level from my previous level’s writeup.

As mentioned in the level 0 introduction page, all level’s passwords are stored in /etc/bandit_pass/ but they can only be accessed by the level’s user themselves.

bandit13_2

Now that we are logged in to bandit14, we can retrieve its password, which is 4wcYUJFw0k0XLShlDzztnTBHiqxU3b3e.

Now, we need to submit it to port 30000 on localhost. We can do it using many ways, one of them is netcat.

bandit14@melinda:~$ nc localhost 30000
4wcYUJFw0k0XLShlDzztnTBHiqxU3b3e
Correct!
BfMYroe26WYalil77FoDi9qh59eK5xNr

Another way is using telnet, well, either way works. There are many other ways too, let’s not get into that.

bandit14@melinda:~$ telnet localhost 30000
Trying 127.0.0.1...
Connected to localhost.
Escape character is '^]'.
4wcYUJFw0k0XLShlDzztnTBHiqxU3b3e
Correct!
BfMYroe26WYalil77FoDi9qh59eK5xNr

Connection closed by foreign host.

The password to gain access to the next level is BfMYroe26WYalil77FoDi9qh59eK5xNr.

OverTheWire: Bandit Level 13 to Level 14

bandit13_1

Level goal: The password for the next level is stored in /etc/bandit_pass/bandit14 and can only be read by user bandit14. For this level, you don’t get the next password, but you get a private SSH key that can be used to log into the next level. Note: localhost is a hostname that refers to the machine you are working on


This level tests us on an essential skills on navigating around various servers using SSH protocol – to login without a password. Many organisations use this method of accessing their servers as they will not be prone to brute force password attack.

To access the next level, simple login using the sshkey.private which was provided to you on the root directory using the following command:

bandit13@melinda:~$ ssh -i ./sshkey.private bandit14@localhost

Next, if you really want to know the password, you can read it from the /etc/bandit_pass/bandit14 path. As mentioned in the level 0 introduction page, all level’s passwords are stored in that path but they can only be accessed by the level’s user themselves.

bandit13_2

The password to gain access to the next level is 4wcYUJFw0k0XLShlDzztnTBHiqxU3b3e.

OverTheWire: Bandit Level 12 to Level 13

bandit12_1

Level goal: The password for the next level is stored in the file data.txt, which is a hexdump of a file that has been repeatedly compressed. For this level it may be useful to create a directory under /tmp in which you can work using mkdir. For example: mkdir /tmp/myname123. Then copy the datafile using cp, and rename it using mv (read the manpages!)


This level is one of the most tedious stage in this CTF challenge. First, let’s move the file to a new directory in the /tmp folder under your name (create one using the mkdir command!).

Now we have to perform a reverse hashdump using xxd command,

bandit12@melinda:/tmp/kongwenbin12$ xxd -r data.txt > kwbfile

bandit12_2

bandit12_3

After performing the reverse hashdump command and writing the output to a file (in my case, I have named it “kwbfile”), run the file command to check what kind of file is it.

bandit12@melinda:/tmp/kongwenbin12$ file kwbfile
kwbfile: gzip compressed data, was "data2.bin", from Unix, last modified: Fri Nov 14 10:32:20 2014, max compression

From here onwards, the flow goes like this,

  1. Identify what type of file is this, using the file command
  2. Rename it to that particular file format, using the mv command to change its file type
  3. Decompress/unzip the files using the correct type of tool
  4. Repeat the above process until you have the file

The following is a dump of the commands I have, it will be quite lengthy. However, it basically follows the flow which I described above. I have added a “line break” after each change in file type, to make it easier to follow. I hope it helps!

Scroll to the bottom for the password to gain access to the next level. 

bandit12@melinda:/tmp/kongwenbin12$ file kwbfile
kwbfile: gzip compressed data, was "data2.bin", from Unix, last modified: Fri Nov 14 10:32:20 2014, max compression
bandit12@melinda:/tmp/kongwenbin12$ mv kwbfile kwbfile.gz
bandit12@melinda:/tmp/kongwenbin12$ gzip -d kwbfile.gz

bandit12@melinda:/tmp/kongwenbin12$ file kwbfile
kwbfile: bzip2 compressed data, block size = 900k
bandit12@melinda:/tmp/kongwenbin12$ mv kwbfile kwbfile.bz2
bandit12@melinda:/tmp/kongwenbin12$ bzip2 -d kwbfile.bz2

bandit12@melinda:/tmp/kongwenbin12$ file kwbfile
kwbfile: gzip compressed data, was "data4.bin", from Unix, last modified: Fri Nov 14 10:32:20 2014, max compression
bandit12@melinda:/tmp/kongwenbin12$ mv kwbfile kwbfile.gz
bandit12@melinda:/tmp/kongwenbin12$ gzip -d kwbfile.gz

bandit12@melinda:/tmp/kongwenbin12$ file kwbfile
kwbfile: POSIX tar archive (GNU)
bandit12@melinda:/tmp/kongwenbin12$ mv kwbfile kwbfile.tar
bandit12@melinda:/tmp/kongwenbin12$ tar xvf kwbfile.tar
data5.bin

bandit12@melinda:/tmp/kongwenbin12$ file data5.bin
data5.bin: POSIX tar archive (GNU)
bandit12@melinda:/tmp/kongwenbin12$ mv data5.bin data5.tar
bandit12@melinda:/tmp/kongwenbin12$ tar xvf data5.tar
data6.bin

bandit12@melinda:/tmp/kongwenbin12$ file data6.bin
data6.bin: bzip2 compressed data, block size = 900k
bandit12@melinda:/tmp/kongwenbin12$ mv data6.bin data6.bz2
bandit12@melinda:/tmp/kongwenbin12$ bzip2 -d data6.bz2

bandit12@melinda:/tmp/kongwenbin12$ file data6
data6: POSIX tar archive (GNU)
bandit12@melinda:/tmp/kongwenbin12$ mv data6 data6.tar
bandit12@melinda:/tmp/kongwenbin12$ tar xvf data6.tar
data8.bin

bandit12@melinda:/tmp/kongwenbin12$ file data8.bin
data8.bin: gzip compressed data, was "data9.bin", from Unix, last modified: Fri Nov 14 10:32:20 2014, max compression
bandit12@melinda:/tmp/kongwenbin12$ mv data8.bin data8.gz
bandit12@melinda:/tmp/kongwenbin12$ gzip -d data8.gz

bandit12@melinda:/tmp/kongwenbin12$ file data8
data8: ASCII text
bandit12@melinda:/tmp/kongwenbin12$ cat data8
The password is 8ZjyCRiBWFYkneahHwxCv3wb2a1ORpYL

The password to gain access to the next level is 8ZjyCRiBWFYkneahHwxCv3wb2a1ORpYL.